The 2014 Ford F150 boasts rugged performance and timeless style, but its factory stereo often leaves much to be desired. Weak sound quality, limited features, and outdated technology can dampen your driving experience. Upgrading the stereo system breathes new life into your truck, delivering crisp audio, modern connectivity, and a personalized vibe. This guide walks you through everything you need to know to upgrade your 2014 Ford F150 stereo, from choosing components to installation tips, ensuring a seamless transformation.
Contents
- Why Upgrade Your 2014 Ford F150 Stereo?
- Step 1: Assess Your Current Audio System
- Step 2: Choose the Right Aftermarket Stereo Components
- Step 3: Gather Tools and Accessories
- Step 4: Install Your New Stereo System
- Step 5: Troubleshoot Common Issues
- Budgeting for Your Stereo Upgrade
- Tips for Maintaining Your New Audio System
- Popular Upgrades for 2014 Ford F150 Owners
- Where to Buy Stereo Components
- Legal Considerations
- Conclusion
Why Upgrade Your 2014 Ford F150 Stereo?
The stock audio system in the 2014 Ford F150, while functional, struggles to meet modern expectations. Tinny speakers, lackluster bass, and minimal integration with smartphones frustrate drivers who crave immersive sound. An upgrade tackles these issues head-on, offering benefits like:
- Enhanced Sound Quality: Aftermarket stereos and speakers deliver richer highs, deeper lows, and balanced mids.
- Modern Features: Bluetooth, Apple CarPlay, Android Auto, and touchscreen displays keep you connected.
- Customization: Tailor your setup to match your music preferences, whether you love rock, hip-hop, or podcasts.
- Increased Resale Value: A high-quality audio system boosts your truck’s appeal to future buyers.
Before diving into the upgrade process, consider your goals. Do you want booming bass for road trips? Crystal-clear vocals for talk radio? Or seamless smartphone integration for navigation? Defining your priorities shapes your choices and budget.
Step 1: Assess Your Current Audio System
Start by evaluating the factory setup in your 2014 Ford F150. Ford offered several audio configurations, including a basic four-speaker system, a premium Sony system, or a mid-tier setup with a subwoofer. Check your truck’s trim level (XL, XLT, Lariat, etc.) to understand what you’re working with. Pop off a speaker grille or consult your owner’s manual to confirm speaker sizes—typically 6×8 inches in the doors and 6.5 inches in the rear.
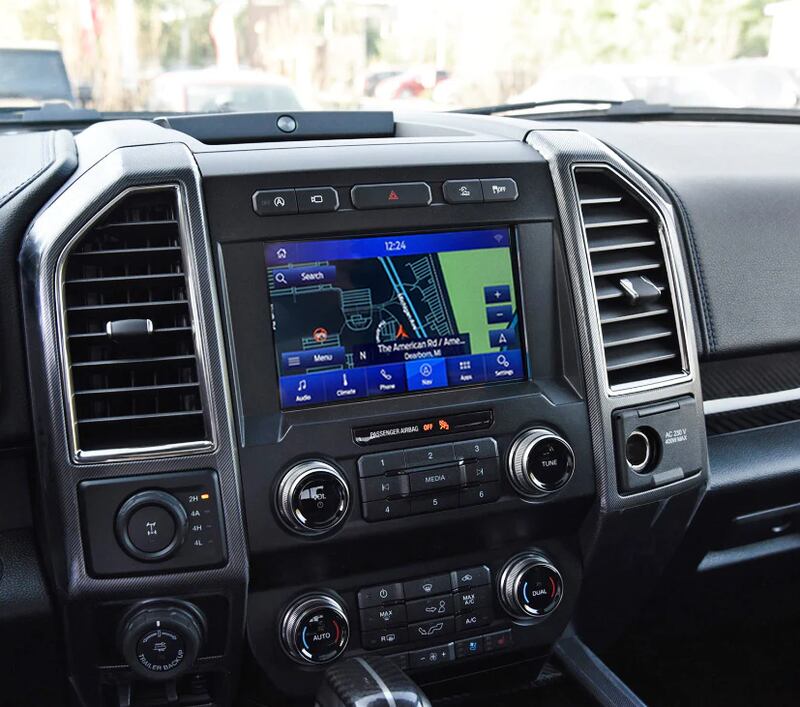
Next, inspect the head unit. Most 2014 F150s feature a single-DIN or double-DIN radio with basic controls. Higher trims may include a touchscreen or SYNC system. Knowing these details helps you select compatible aftermarket parts. For instance, a double-DIN head unit offers more screen real estate for navigation and apps.
Step 2: Choose the Right Aftermarket Stereo Components
Selecting the right components sets the stage for a stellar audio experience. Focus on three key areas: the head unit, speakers, and optional add-ons like amplifiers or subwoofers. Here’s a breakdown of each.
Head Unit
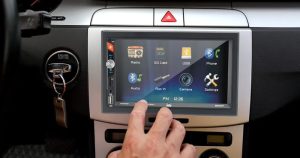
The head unit serves as the brain of your audio system. For the 2014 Ford F150, a double-DIN head unit maximizes functionality and fits seamlessly with a dash kit. Top brands like Pioneer, Kenwood, and Alpine offer models packed with features. Look for these must-haves:
- Bluetooth Connectivity: Stream music and take hands-free calls.
- Apple CarPlay/Android Auto: Sync your smartphone for apps, maps, and messages.
- Touchscreen Display: A 7-inch or larger screen simplifies navigation.
- USB/Aux Inputs: Connect devices for versatile playback.
A popular choice is the Pioneer AVH-2500NEX, which combines a responsive touchscreen, wireless CarPlay, and robust sound controls. Expect to spend $200–$600 for a quality head unit.
Speakers
Upgrading speakers dramatically improves sound clarity. The 2014 F150’s 6×8-inch door speakers and 6.5-inch rear speakers pair well with aftermarket options from brands like JL Audio, Focal, or Kicker. Consider these factors:
- Component vs. Coaxial: Component speakers separate tweeters and woofers for precise sound, while coaxial speakers are easier to install and budget-friendly.
- Power Handling: Match speakers to your head unit’s RMS output (typically 15–50 watts) or plan for an amplifier.
- Sensitivity: Higher sensitivity (above 90 dB) ensures efficient sound production.
The Kicker DS Series 6×8-inch coaxial speakers strike a balance between price and performance, delivering punchy bass and clear highs for around $100 per pair.
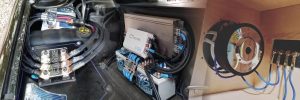
Amplifiers and Subwoofers
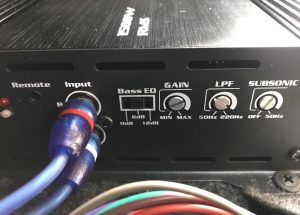
For audiophiles craving earth-shaking bass, an amplifier and subwoofer elevate the experience. An amplifier boosts power to your speakers, preventing distortion at high volumes. A compact 4-channel amp, like the Alpine BBX-T600, fits under a seat and powers your entire system.
Subwoofers add depth to low frequencies. A 10- or 12-inch subwoofer in a custom enclosure tucks neatly behind the rear seat. The JL Audio 10W3v3-4 offers tight, accurate bass without overwhelming the cabin. Budget $150–$400 for an amp and $100–$300 for a subwoofer.
Step 3: Gather Tools and Accessories
Before installation, stock up on tools and accessories to streamline the process. You’ll need:
- Screwdrivers and Torx Bits: For removing panels and screws (T20 and T25 are common).
- Panel Removal Tools: Plastic pry tools prevent damage to trim.
- Wire Harness Adapter: Connects the aftermarket head unit to the F150’s wiring without cutting.
- Dash Kit: Ensures a flush fit for double-DIN head units.
- Speaker Adapters: Align aftermarket speakers with factory mounts.
- Crimping Tool and Connectors: Secure wiring connections.
- Sound Deadening Material: Reduces road noise for cleaner audio.
A wiring harness adapter specific to the 2014 Ford F150 (like the Metra 70-5521) saves time and preserves factory wiring. Expect to spend $50–$150 on accessories.
Step 4: Install Your New Stereo System
With components and tools ready, it’s time to install. Follow these steps for a smooth upgrade. If you’re new to car audio, consider watching YouTube tutorials specific to the 2014 F150 for visual guidance.
Remove the Factory Head Unit
- Disconnect the Battery: Prevent electrical shorts by disconnecting the negative battery terminal.
- Remove the Dash Trim: Use a panel removal tool to pry off the center console trim around the radio. Work gently to avoid scratches.
- Unscrew the Head Unit: Remove the bolts (usually four) securing the factory radio. Pull it out and unplug the wiring harness and antenna.
- Install the Dash Kit: Attach the double-DIN dash kit to your new head unit, following the kit’s instructions.
- Connect Wiring: Plug the wire harness adapter into the truck’s wiring and the new head unit. Secure connections with crimps or solder.
- Mount the Head Unit: Slide the new unit into the dash, secure it with bolts, and snap the trim back into place.
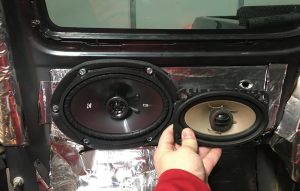
Replace the Speakers
- Access Door Panels: Remove door panels by unscrewing bolts and prying off the panel with a plastic tool. Check for hidden clips.
- Remove Old Speakers: Unscrew the factory speakers and disconnect the wiring.
- Install New Speakers: Use speaker adapters if needed. Connect the new speakers to the wiring harness and screw them into place.
- Test and Reassemble: Test the speakers before reattaching door panels to ensure proper sound.
Add an Amplifier and Subwoofer (Optional)
- Mount the Amplifier: Secure the amp under a seat or in the trunk. Run power and ground wires to the battery and chassis, respectively.
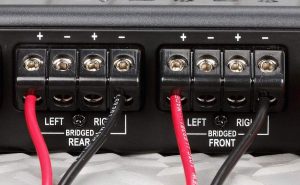
- Connect RCA Cables: Link the head unit’s preamp outputs to the amp’s inputs.
- Install the Subwoofer: Place the subwoofer enclosure behind the rear seat or in the cargo area. Connect it to the amp with speaker wire.
- Tune the System: Adjust the amp’s gain and crossover settings to balance sound output.
Final Touches
Reconnect the battery and test the entire system. Play different music genres to fine-tune equalizer settings. Apply sound deadening material to door panels or the floor to minimize vibrations and enhance audio clarity.
Step 5: Troubleshoot Common Issues
Even with careful installation, issues may arise. Here’s how to tackle common problems:
- No Sound: Check wiring connections and ensure the head unit’s settings are correct. Verify the amp is powered if used.
- Distorted Audio: Lower the amp’s gain or check for loose speaker connections.
- Bluetooth Pairing Fails: Reset the head unit and re-pair your device. Update firmware if available.
- Fitment Issues: Double-check dash kit and speaker adapter compatibility.
If problems persist, consult a professional installer or online forums like F150Forum.com for model-specific advice.
Budgeting for Your Stereo Upgrade
Costs vary based on components and whether you install yourself or hire a pro. Here’s a rough breakdown:
- Head Unit: $200–$600
- Speakers: $100–$300 (for two pairs)
- Amplifier: $150–$400
- Subwoofer: $100–$300
- Accessories: $50–$150
- Professional Installation: $100–$500
A basic setup with a head unit and speakers runs $350–$600. A premium system with an amp and subwoofer can hit $1,000–$2,000. DIY installation saves money but requires time and patience.
Tips for Maintaining Your New Audio System
Keep your stereo performing at its best with these tips:
- Clean Regularly: Dust the head unit and speakers to prevent grime buildup.
- Check Connections: Inspect wiring annually for wear or loose connections.
- Update Software: Install firmware updates for the head unit to maintain compatibility with devices.
- Avoid Overloading: Don’t crank the volume past 80% to prevent speaker damage.
Popular Upgrades for 2014 Ford F150 Owners
Beyond the basics, consider these enhancements to elevate your audio setup:
- Sound Processor: A digital sound processor (DSP) fine-tunes audio for studio-quality sound.
- Backup Camera: Pair your head unit with a rearview camera for added safety.
- Custom Enclosures: Build a tailored subwoofer box for optimal bass response.
- LED Lighting: Sync interior lights with your music for a vibrant vibe.
Where to Buy Stereo Components
Shop reputable retailers for quality parts and warranties. Top options include:
- Crutchfield: Offers vehicle-specific guides and free wiring harnesses with purchases.
- Amazon: Wide selection with competitive prices and fast shipping.
- Best Buy: Provides installation services alongside components.
- Local Audio Shops: Support small businesses and get expert advice.
Compare prices and read reviews to ensure you’re getting reliable gear. Avoid no-name brands that may fail prematurely.
Legal Considerations
Before blasting your new system, check local noise ordinances. Some areas impose fines for excessive vehicle audio. Also, ensure your subwoofer or amp installation doesn’t obstruct airbags or compromise safety features.
Conclusion
Upgrading your 2014 Ford F150 stereo transforms your truck into a rolling concert hall. By choosing the right head unit, speakers, and accessories, you create a system that matches your style and budget. Follow the steps outlined, take your time with installation, and troubleshoot issues promptly. Whether you’re cruising backroads or stuck in traffic, your new audio setup delivers the soundtrack your F150 deserves. Ready to get started? Grab your tools, pick your components, and crank up the volume!