The Ford Bronco embodies adventure, ruggedness, and freedom. Whether you’re cruising through city streets or tackling off-road trails, your driving experience deserves a soundtrack that matches the Bronco’s bold spirit. However, the stock stereo system in many Bronco models often falls short, delivering lackluster sound quality that fails to impress. Upgrading your Bronco’s audio system can elevate your journeys, providing crisp highs, deep bass, and immersive sound. This comprehensive guide walks you through everything you need to know to transform your Bronco’s audio setup, from choosing components to installation tips, ensuring you achieve a premium sound system tailored to your needs.
Contents
- Why Upgrade Your Ford Bronco’s Stereo System?
- Step 1: Evaluate Your Current Bronco Audio System
- Step 2: Set a Budget for Your Audio Upgrade
- Step 3: Choose the Right Components for Your Bronco
- Step 4: Plan Your Installation
- Step 5: Fine-Tune Your Audio System
- Step 6: Maintain Your Bronco’s Audio System
- Common Mistakes to Avoid
- Recommended Audio Brands for Your Bronco
- Bronco-Specific Considerations
- Cost vs. Performance: Finding the Sweet Spot
- Where to Buy Bronco Audio Components
- DIY vs. Professional Installation: Which Is Right for You?
- Real-World Bronco Audio Upgrade Stories
- Conclusion: Elevate Your Bronco’s Audio Experience
Why Upgrade Your Ford Bronco’s Stereo System?
The factory audio system in the Ford Bronco, while functional, often disappoints audiophiles and casual listeners alike. Common issues include weak bass, muffled mids, and limited clarity at higher volumes. For a vehicle designed for adventure, a subpar stereo can dampen the vibe. Upgrading your Bronco’s sound system offers several benefits:
- Enhanced Sound Quality: Premium speakers, amplifiers, and subwoofers deliver richer, more detailed audio.
- Personalized Listening Experience: Tailor the sound to your preferences, whether you love booming bass for hip-hop or crystal-clear vocals for acoustic tracks.
- Increased Resale Value: A high-quality audio system can make your Bronco more appealing to future buyers.
- Immersive Driving: A powerful stereo transforms long drives and off-road adventures into memorable experiences.
Before diving into the upgrade process, assess your goals. Are you seeking a modest improvement or a complete audio overhaul? Your budget, music preferences, and technical skills will shape your upgrade path.
Step 1: Evaluate Your Current Bronco Audio System
Start by understanding your Bronco’s existing audio setup. Ford offers different stereo configurations depending on the trim level (Base, Big Bend, Black Diamond, Outer Banks, Wildtrak, or Raptor). Entry-level models typically feature a basic 6-speaker system, while higher trims may include a B&O (Bang & Olufsen) 10-speaker system with a subwoofer. However, even the B&O system can underwhelm compared to aftermarket options.
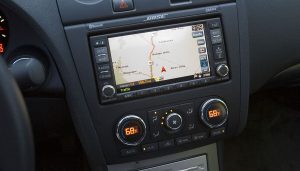
To evaluate your system, listen critically to your current setup. Play a variety of music genres—rock, jazz, EDM, and podcasts—to identify weaknesses. Notice if the bass feels weak, the vocals sound muddy, or the highs distort at louder volumes. Check your Bronco’s head unit (the in-dash receiver) for connectivity options like Bluetooth, Apple CarPlay, Android Auto, or auxiliary inputs. Knowing these details helps you decide which components to upgrade and whether you need additional accessories.
Step 2: Set a Budget for Your Audio Upgrade
Bronco stereo upgrades vary widely in cost, from a few hundred dollars for speaker replacements to several thousand for a full system overhaul. Setting a budget upfront keeps your project on track. Here’s a rough breakdown of costs:
- Speakers: $100–$500 per pair for high-quality aftermarket speakers.
- Subwoofer: $150–$600, depending on size and brand.
- Amplifier: $200–$1,000 for a multi-channel amp to power speakers and subwoofers.
- Head Unit: $200–$1,500 for a modern receiver with touchscreen and smartphone integration.
- Installation Accessories: $50–$200 for wiring harnesses, adapters, and sound-deadening materials.
- Professional Installation: $200–$1,000, depending on complexity.
If you’re on a tight budget, prioritize speaker upgrades and sound-deadening materials for noticeable improvements. For a premium setup, invest in a subwoofer, amplifier, and high-end head unit.
Step 3: Choose the Right Components for Your Bronco
Selecting the right audio components ensures your upgraded system delivers the sound quality you crave. Let’s break down the key elements of a Bronco stereo upgrade.
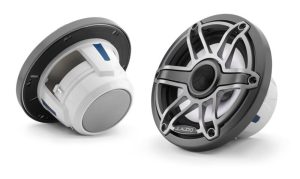
Speakers
Speakers are the heart of your audio system. The Bronco typically uses 6.5-inch speakers in the front and rear doors, with smaller tweeters in the dashboard or A-pillars. Opt for component speakers for the best sound quality, as they separate the woofer and tweeter for better clarity. Coaxial speakers, which combine the woofer and tweeter, are easier to install and more budget-friendly.
Top brands like Focal, JL Audio, Hertz, and Alpine offer excellent options for the Bronco. Look for speakers with high sensitivity (above 90 dB) and a power handling capacity that matches your amplifier. For example, Focal’s Access 165 AS component speakers deliver crisp highs and punchy mids, ideal for a Bronco’s rugged interior.
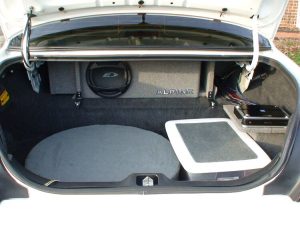
Subwoofer
A subwoofer adds depth to your music, reproducing low frequencies that standard speakers can’t handle. For the Bronco, a compact 10-inch or 12-inch subwoofer fits well in the cargo area without sacrificing space. Powered subwoofers, which include a built-in amplifier, simplify installation and save space.
JL Audio’s Stealthbox, designed specifically for the Bronco, integrates seamlessly into the cargo area, delivering powerful bass without compromising storage. Alternatively, Kicker’s CompR series offers affordable yet robust subwoofers for custom enclosures. Choose a subwoofer with a sealed enclosure for tight, accurate bass or a ported enclosure for louder, boomy bass.
Amplifier
An amplifier boosts the power to your speakers and subwoofer, ensuring clean, distortion-free sound at high volumes. For the Bronco, a 4-channel amplifier powers the front and rear speakers, while a mono amplifier drives the subwoofer. Compact amps, like those from Rockford Fosgate or Audison, fit easily under seats or in the cargo area.
Match the amplifier’s RMS power output to your speakers’ power handling for optimal performance. For instance, a 75-watt-per-channel amp pairs well with speakers rated for 60–80 watts RMS. Look for amps with adjustable crossovers and bass boost for fine-tuning your sound.
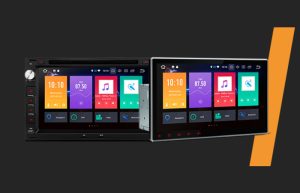
Head Unit
The head unit controls your audio system and provides connectivity features. While the Bronco’s stock head unit supports modern features like Apple CarPlay and Android Auto, an aftermarket receiver can enhance sound quality and customization. Brands like Kenwood, Pioneer, and Alpine offer touchscreen head units with built-in equalizers, time alignment, and high-voltage preamp outputs for better signal quality.
Ensure the new head unit fits the Bronco’s double-DIN dash opening. Use a dash kit and wiring harness adapter for a clean installation. If you prefer to keep the stock head unit, a digital signal processor (DSP) can improve audio output by correcting factory equalization.
Sound-Deadening Materials
The Bronco’s rugged interior, with its hard surfaces and removable top, creates a noisy environment that degrades sound quality. Sound-deadening materials, like Dynamat or Noico, reduce road noise, vibrations, and rattles. Apply these materials to the doors, floor, and cargo area before installing new speakers and subwoofers. This step enhances bass response and clarity, making your system sound more polished.
Step 4: Plan Your Installation
Installing a new stereo system in your Bronco requires careful planning to avoid mistakes and ensure a professional result. Decide whether to tackle the project yourself or hire a professional. DIY installation saves money but demands time, tools, and technical know-how. Professional installation guarantees a clean setup but increases costs.
Tools You’ll Need for DIY Installation
- Screwdrivers (Phillips and flathead)
- Panel removal tools
- Wire cutters and strippers
- Crimping tool
- Soldering iron (optional for secure connections)
- Multimeter (to test wiring)
- Socket wrench set
- Drill (for custom subwoofer enclosures)
Installation Steps
- Disconnect the Battery: Prevent electrical shorts by disconnecting the negative battery terminal.
- Remove Interior Panels: Use panel removal tools to access the stock speakers in the doors and dashboard. Be gentle to avoid damaging clips or panels.
- Replace Speakers: Install new speakers using adapter brackets if needed. Connect the wiring harness or solder the speaker wires for a secure connection.
- Install the Subwoofer: Mount the subwoofer in the cargo area, ensuring it’s secure and doesn’t obstruct storage. Run power and signal cables neatly along the vehicle’s interior.
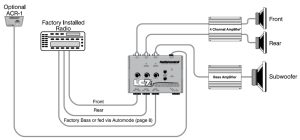
- Add the Amplifier: Mount the amp under a seat or in the cargo area. Connect it to the head unit, speakers, and subwoofer using high-quality RCA cables and power wires.
- Upgrade the Head Unit (Optional): Remove the stock receiver and install the new head unit using a dash kit. Connect the wiring harness and test all functions.
- Apply Sound Deadening: Cut and apply sound-deadening mats to the doors, floor, and cargo area. Press firmly to ensure adhesion.
- Test the System: Reconnect the battery and test the system. Adjust the amplifier’s gain, crossover settings, and head unit equalizer for balanced sound.
- Secure All Components: Double-check that all wiring, speakers, and components are secure before reassembling the interior.
Tips for a Clean Installation
- Label wires to avoid confusion during reconnection.
- Use zip ties to organize cables and prevent rattling.
- Test each component (speakers, subwoofer, amp) before reassembling panels.
- Follow the Bronco’s factory wiring diagram to avoid cutting unnecessary wires.
Step 5: Fine-Tune Your Audio System
After installation, fine-tuning your system ensures optimal performance. Use the head unit’s equalizer to adjust bass, midrange, and treble levels based on your music preferences. If your system includes a DSP, use it to correct time alignment and balance the soundstage so audio appears to come from the center of the dashboard.
Experiment with the amplifier’s crossover settings to direct low frequencies to the subwoofer and higher frequencies to the speakers. For example, set the subwoofer’s low-pass filter to 80 Hz and the speakers’ high-pass filter to 100 Hz for a smooth transition. Play a variety of tracks to test the system’s versatility, from bass-heavy rap to intricate classical music.
Step 6: Maintain Your Bronco’s Audio System
Regular maintenance keeps your upgraded stereo sounding its best. Dust and debris can accumulate on speakers, especially in a Bronco with a removable top. Clean the speaker grilles periodically with a soft brush or compressed air. Check wiring connections every few months to ensure they remain secure.
Protect your system from extreme temperatures by parking in shaded areas or using a sunshade. If you frequently drive off-road, inspect the subwoofer and amplifier mounts for looseness after rough trips. Update the head unit’s firmware to maintain compatibility with your smartphone and apps.
Common Mistakes to Avoid
Upgrading your Bronco’s stereo can be rewarding, but pitfalls can derail your project. Steer clear of these common errors:
- Choosing Mismatched Components: Ensure your speakers, subwoofer, and amplifier are compatible in terms of power handling and impedance.
- Skipping Sound Deadening: Without sound-deadening materials, road noise can overpower your new system.
- Overloading the Electrical System: High-powered amplifiers may require a capacitor or upgraded alternator to prevent dimming lights or battery drain.
- Ignoring Warranty: Check your Bronco’s warranty before modifying the electrical system, as some upgrades may void coverage.
- Poor Wiring Practices: Use proper gauge wires and secure connections to avoid signal loss or electrical issues.
Recommended Audio Brands for Your Bronco
To simplify your shopping, here are some trusted brands that deliver exceptional performance for Bronco stereo upgrades:
- Focal: Known for crystal-clear sound and durable construction, ideal for component speakers.
- JL Audio: Offers top-tier subwoofers and amplifiers, including Bronco-specific solutions like the Stealthbox.
- Alpine: Provides versatile head units and speakers with excellent smartphone integration.
- Kicker: Budget-friendly subwoofers and speakers with solid bass output.
- Rockford Fosgate: Reliable amplifiers and coaxial speakers for easy installation.
Bronco-Specific Considerations
The Ford Bronco’s unique design influences your audio upgrade. Its removable doors and top increase cabin noise, making sound deadening essential. The compact cargo area limits subwoofer size, so prioritize space-saving options like powered subwoofers or custom enclosures. If you plan to keep the factory head unit, ensure your amplifier and DSP integrate seamlessly with Ford’s SYNC system.
For off-road enthusiasts, secure all components to withstand vibrations and jolts. Use weather-resistant speakers or protective covers if you frequently drive with the top off. If you own a Bronco Raptor, check for model-specific audio constraints, as its premium B&O system may require different upgrade strategies.
Cost vs. Performance: Finding the Sweet Spot
Balancing cost and performance is key to a successful Bronco stereo upgrade. A modest setup with quality coaxial speakers and sound-deadening materials can transform your audio for under $500. For a mid-range system, add a compact subwoofer and a 4-channel amplifier for $1,000–$1,500. A high-end setup with component speakers, a custom subwoofer enclosure, a DSP, and a premium head unit may cost $2,500 or more.
Invest in quality over quantity. A well-chosen $200 speaker pair often outperforms a cheap $400 full system. Read reviews, listen to components at audio shops, and consult forums like Bronco6G for real-world feedback from Bronco owners.
Where to Buy Bronco Audio Components
Shop for audio components at reputable retailers to ensure authenticity and warranty coverage. Online stores like Crutchfield, Amazon, and Sonic Electronix offer a wide selection with customer reviews. Specialty retailers like Car Audio Factory or local car audio shops provide expert advice and installation services. Check manufacturer websites for authorized dealers to avoid counterfeit products.
DIY vs. Professional Installation: Which Is Right for You?
Deciding between DIY and professional installation depends on your skills and goals. DIY suits those with experience in car audio or a willingness to learn. You’ll save money and gain a deeper understanding of your Bronco’s audio system. However, mistakes can damage components or your vehicle’s interior.
Professional installation ensures a polished result, especially for complex setups involving DSPs or custom enclosures. Certified installers, like those at Best Buy or local audio shops, follow industry standards and often provide warranties on their work. If you’re unsure, start with a simple speaker upgrade yourself and hire a pro for amplifiers or subwoofers.
Real-World Bronco Audio Upgrade Stories
Bronco owners who’ve upgraded their stereos report transformative results. Jake, a Wildtrak owner from Colorado, replaced his stock speakers with Focal components and added a JL Audio Stealthbox. “The difference is night and day,” he says. “I feel like I’m in a concert hall, even on bumpy trails.” Sarah, a Big Bend owner in Texas, opted for a budget-friendly Kicker subwoofer and sound deadening. “For under $600, my music sounds so much richer,” she shares.
These stories highlight the impact of a well-planned audio upgrade. Search Bronco forums and YouTube for more inspiration and installation tutorials tailored to your model.
Conclusion: Elevate Your Bronco’s Audio Experience
Upgrading your Ford Bronco’s stereo system unlocks a world of immersive sound, turning every drive into a musical adventure. By assessing your current setup, choosing quality components, and planning a careful installation, you can achieve a custom audio system that rivals high-end vehicles. Whether you’re blasting rock anthems on the highway or enjoying podcasts on a quiet trail, a premium stereo enhances your Bronco’s rugged charm.
Ready to start? Set your budget, pick your components, and decide on DIY or professional installation. With the right approach, your Bronco will deliver not just thrilling performance but also a soundtrack that fuels your soul. Share your upgrade journey in the comments or on Bronco forums to inspire fellow enthusiasts!