Installing a new car stereo sparks excitement, but it also brings questions, especially about wiring. One wire that often confuses people is the illumination wire. Do you need to connect it? What happens if you skip it? This guide dives deep into the role of the illumination wire, its importance, and how to handle it during your car audio installation. By the end, you’ll have a clear understanding of whether connecting this wire is essential for your setup and how to troubleshoot common issues. Let’s get started.
Contents
- What Is the Illumination Wire?
- Do You Have to Connect the Illumination Wire?
- Why Connect the Illumination Wire?
- What Happens If You Don’t Connect the Illumination Wire?
- How to Connect the Illumination Wire
- Common Issues and Troubleshooting
- When to Skip the Illumination Wire
- Tips for a Successful Car Stereo Installation
- Frequently Asked Questions
- Conclusion
What Is the Illumination Wire?
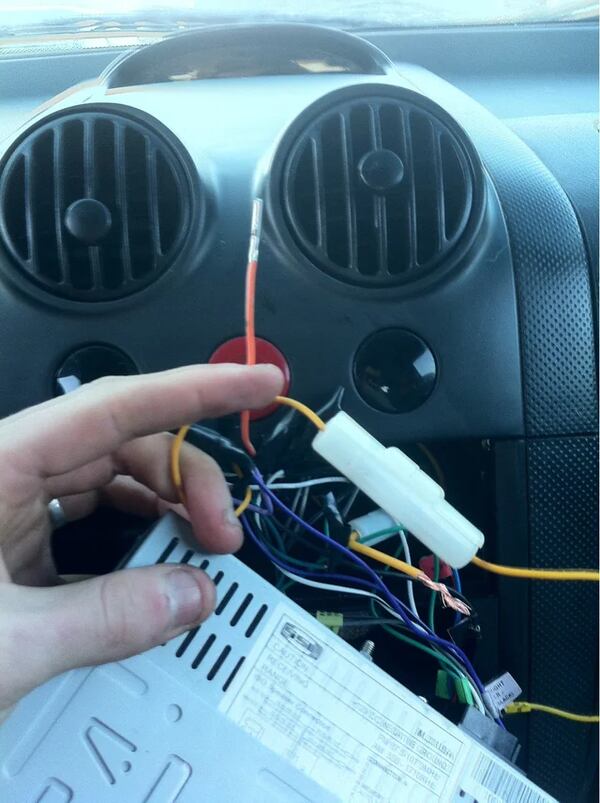
The illumination wire, often labeled as “ILL” or “DIM” in wiring harnesses, controls the dimming function of your car stereo’s display and buttons. This orange or orange-with-white-stripe wire syncs the stereo’s lighting with your vehicle’s dashboard lights. When you turn on your headlights or adjust the dashboard brightness, the illumination wire signals the stereo to dim or brighten accordingly. This ensures the stereo’s display doesn’t blind you at night or appear too dim during the day.
This wire connects to your vehicle’s lighting system, typically the headlight switch or dashboard dimmer circuit. Its primary job? To enhance visibility and safety while driving. Without it, your stereo’s display might stay at a fixed brightness, which can be distracting or hard to read in certain lighting conditions.
Do You Have to Connect the Illumination Wire?
Here’s the short answer: No, you don’t have to connect the illumination wire for your car stereo to work. The stereo will still play music, switch stations, and function normally without it. However, skipping this connection means you lose the dimming feature. Your stereo’s display and buttons will stay at a constant brightness, which might not suit every driving situation.
For example, a bright display at night can strain your eyes or distract you from the road. On the flip side, a dim display during the day might be hard to read, forcing you to squint at the screen. Connecting the illumination wire solves these issues by syncing the stereo’s lighting with your vehicle’s dashboard controls. So, while it’s not mandatory, hooking it up improves your driving experience and safety.
Why Connect the Illumination Wire?
Let’s break down the benefits of connecting the illumination wire. These advantages explain why most car audio enthusiasts recommend including it in your setup.
1. Improved Visibility and Comfort
The illumination wire ensures your stereo’s display adjusts to ambient lighting. When you turn on your headlights, the stereo dims to prevent glare. During the day, it brightens for easy reading. This dynamic adjustment reduces eye strain and keeps your focus on the road.
2. Seamless Integration with Your Vehicle
A connected illumination wire makes your aftermarket stereo feel like a factory-installed unit. The synchronized lighting creates a polished, professional look, blending the stereo with your dashboard’s aesthetic.
3. Enhanced Safety
Driving at night with a overly bright stereo display can distract you or impair your night vision. The illumination wire prevents this by dimming the screen automatically, helping you stay focused on the road.
4. Customization
Some stereos allow you to tweak the dimming settings through the illumination wire. You can adjust the brightness to your preference, giving you more control over the display’s appearance.
What Happens If You Don’t Connect the Illumination Wire?
If you choose not to connect the illumination wire, your car stereo will still function, but you’ll notice a few drawbacks. The display and buttons will remain at a fixed brightness, which may not adjust to changing light conditions. Here’s what you might experience:
- Nighttime Driving: A bright display can create glare, making it harder to see the road or read the screen comfortably.
- Daytime Driving: A dim display might be tough to read in bright sunlight, forcing you to lean closer or adjust your position.
- Inconsistent Look: Without dimming, your stereo’s lighting won’t match your dashboard, creating a disjointed appearance.
In some cases, you can manually adjust the stereo’s brightness through its settings menu. However, this requires you to change the settings every time the lighting conditions shift, which can be inconvenient. Connecting the illumination wire automates this process, saving you time and effort.
How to Connect the Illumination Wire
Ready to connect the illumination wire? Follow these steps to ensure a smooth installation. Before you begin, gather these tools: a wiring harness, electrical tape, wire strippers, and a multimeter (optional for testing).
Step 1: Identify the Illumination Wire
Check your car stereo’s wiring diagram or manual to locate the illumination wire. It’s typically orange or orange with a white stripe. On the vehicle side, the corresponding wire connects to the headlight switch or dashboard dimmer circuit. Consult your vehicle’s wiring diagram to confirm.
Step 2: Prepare the Wires
Strip about 1/4 inch of insulation from the ends of both the stereo’s illumination wire and the vehicle’s matching wire. Twist the exposed copper strands to prevent fraying.
Step 3: Connect the Wires
Join the two wires by twisting them together or using a crimp connector. For a secure connection, solder the wires and cover them with heat-shrink tubing or electrical tape. This prevents short circuits and ensures durability.
Step 4: Test the Connection
Turn on your vehicle’s headlights or adjust the dashboard dimmer. The stereo’s display should dim or brighten in sync. If it doesn’t, double-check your connections or use a multimeter to verify voltage on the illumination wire.
Step 5: Secure the Wiring
Tuck the connected wires neatly into the dashboard to avoid interference with other components. Use zip ties or electrical tape to keep them organized.
If you’re unsure about any step, consider consulting a professional car audio installer. A proper connection ensures optimal performance and prevents damage to your stereo or vehicle.
Common Issues and Troubleshooting
Even with careful installation, you might run into problems. Here are common issues with the illumination wire and how to fix them.
1. Stereo Display Doesn’t Dim
If the display stays at a fixed brightness, check the wire connections. Ensure the illumination wire is properly connected to the vehicle’s dimmer circuit. Use a multimeter to confirm the wire receives voltage when the headlights are on. If not, you may have connected to the wrong wire or have a faulty dimmer circuit.
2. Flickering Display
A flickering display often signals a loose connection or interference. Inspect the illumination wire for frayed ends or exposed copper. Tighten the connection and secure it with electrical tape. If the issue persists, check for ground loops or electrical noise in the system.
3. No Power to the Illumination Wire
If the wire doesn’t carry voltage, verify that you’ve connected it to the correct circuit. Some vehicles use separate wires for the headlight and dimmer functions. Refer to your vehicle’s wiring diagram to find the right one.
4. Stereo Malfunctions After Connection
If the stereo behaves erratically after connecting the illumination wire, you might have a short circuit. Disconnect the wire and check for exposed wires touching other components. Insulate all connections properly before reconnecting.
When to Skip the Illumination Wire
In some cases, you might choose not to connect the illumination wire. Here are a few scenarios where skipping it makes sense:
- Manual Brightness Control: If your stereo has a reliable manual brightness setting and you don’t mind adjusting it, you can skip the wire.
- No Dimmer Circuit: Older vehicles may lack a dimmer circuit, making the illumination wire unnecessary.
- Simplified Installation: If you’re aiming for a quick setup and don’t care about dimming, you can leave the wire unconnected.
However, weigh these decisions against the convenience and safety of a fully integrated system. Connecting the wire usually offers more benefits than drawbacks.
Tips for a Successful Car Stereo Installation
To make your installation smooth and effective, keep these tips in mind:
- Read the Manual: Your stereo’s manual provides specific wiring instructions. Follow them to avoid mistakes.
- Use a Wiring Harness Adapter: A harness adapter simplifies connections and prevents cutting your vehicle’s factory wires.
- Test Before Finalizing: Test all functions, including the illumination wire, before securing the stereo in the dashboard.
- Label Wires: If you’re working with multiple wires, label them to avoid confusion.
- Seek Professional Help: If wiring feels overwhelming, a professional installer can ensure a flawless setup.
Frequently Asked Questions
Can I connect the illumination wire to another power source?
No, avoid connecting the illumination wire to a constant power source, as it may cause the stereo to malfunction or drain the battery. Always connect it to the vehicle’s dimmer or headlight circuit.
Will skipping the illumination wire damage my stereo?
No, skipping the wire won’t damage the stereo. It simply disables the dimming feature, leaving the display at a fixed brightness.
How do I know if my vehicle has a dimmer circuit?
Check your vehicle’s manual or test the dashboard lights. If they dim when you adjust a knob or switch, your vehicle likely has a dimmer circuit.
Conclusion
The illumination wire plays a key role in syncing your car stereo’s display with your vehicle’s lighting system. While you don’t have to connect it, doing so enhances visibility, safety, and the overall driving experience. By following the steps outlined above, you can easily integrate this wire into your setup and enjoy a seamless, professional-grade installation. Whether you’re a DIY enthusiast or a first-time installer, understanding the illumination wire’s purpose empowers you to make informed decisions. So, grab your tools, check your wiring diagram, and get ready to elevate your car audio game.