You just installed a brand new aftermarket car stereo, expecting crisp sound quality and enhanced features. Instead, you discover your front left speaker produces no sound at all. This frustrating situation affects countless car audio enthusiasts, but the good news is that most causes have straightforward solutions.
Contents
Understanding Your Car Audio System Basics
Car stereo systems rely on proper electrical connections between the head unit and speakers. When you replace your factory radio with an aftermarket unit, you’re essentially rewiring a complex network of audio signals. The front left speaker channel carries specific electrical signals that must flow uninterrupted from the stereo to the speaker.
Modern vehicles often feature sophisticated wiring harnesses that connect to multiple components. Your aftermarket stereo must communicate correctly with these existing systems to produce balanced sound across all speakers. When one channel fails, it typically indicates a problem with wiring, compatibility, or speaker damage.
Common Causes of Front Left Speaker Failure
Wiring Connection Issues
Loose or incorrect wire connections cause the majority of single-speaker failures. During aftermarket stereo installation, installers must match colored wires from the new unit to corresponding wires in the vehicle’s harness. The front left speaker typically uses specific wire colors, and swapping or disconnecting these wires results in no sound output.
Professional installers use wiring harness adapters to prevent cutting factory wires. However, even with proper adapters, connections can work loose over time. Vibration from driving and temperature changes cause solder joints and wire nuts to fail.
Factory Amplifier Interference
Many modern vehicles include factory amplifiers that boost signals to premium speakers. These amplifiers expect specific signal voltages from the original stereo. When you install an aftermarket unit, voltage mismatches can cause the factory amp to shut down or malfunction.
Some factory amplifiers control individual speaker channels independently. If the front left channel amplifier fails or receives incorrect signals, only that speaker will stop working. This situation commonly occurs in vehicles with Bose, JBL, or other premium audio systems.
Speaker Wire Damage
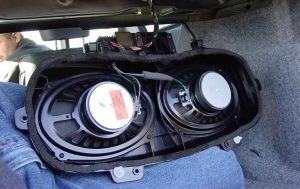
Physical damage to speaker wires often affects single channels. Wires can get pinched during installation, damaged by moisture, or degraded over time. The front left speaker wire typically runs through the vehicle’s door jamb, where repeated opening and closing can cause wire fatigue.
Rodents sometimes chew through automotive wiring, particularly in vehicles stored outdoors. Even minor damage to the positive or negative speaker wire will prevent sound output from that channel.
Incompatible Stereo Settings
Aftermarket stereos include various audio processing features that can interfere with speaker operation. Crossover settings, time alignment, and phase controls might be configured incorrectly for your specific vehicle. Some units include automatic speaker detection that fails to recognize certain speaker types.
Balance and fader controls also affect individual speaker output. If these settings shifted during installation or setup, they might route audio away from the front left channel.
Step-by-Step Troubleshooting Process
Initial Audio Balance Check
Start troubleshooting by checking your stereo’s balance and fader settings. Navigate to the audio settings menu and ensure the balance control sits in the center position. Adjust the fader to send audio only to the front speakers. If sound comes from the front right but not the front left, you’ve confirmed a channel-specific problem.
Test different audio sources including radio, CD, and Bluetooth to rule out source-related issues. Try various volume levels since some problems only manifest at higher or lower outputs.
Physical Connection Inspection
Remove the aftermarket stereo from the dashboard to access the wiring connections. Look for loose, corroded, or disconnected wires behind the unit. Pay special attention to the wiring harness adapter and ensure all connections remain secure.
Check for proper wire matching by consulting both your stereo’s manual and vehicle-specific wiring diagrams. The front left positive wire typically uses a specific color code that varies by manufacturer. Verify that your installer connected these wires correctly.
Testing Speaker Continuity
Use a digital multimeter to test the front left speaker circuit. Set the meter to measure resistance (ohms) and connect the probes to the front left speaker wires at the stereo harness. A functioning speaker should show resistance between 2-8 ohms, depending on the speaker specification.
Infinite resistance indicates an open circuit caused by a broken wire or disconnected speaker. Zero resistance suggests a short circuit that could damage your stereo. Either reading confirms wiring problems that need immediate attention.
Direct Speaker Testing
Disconnect the front left speaker from the vehicle’s wiring and test it directly with a 9-volt battery. Touch the battery terminals briefly to the speaker terminals – you should hear a clicking sound if the speaker functions properly. This test bypasses all vehicle wiring to isolate speaker problems.
If the speaker fails this test, replacement becomes necessary. However, if the speaker works with direct connection, focus troubleshooting efforts on the vehicle’s wiring system.
Advanced Diagnostic Techniques
Factory Amplifier Bypass
Vehicles with factory amplifiers require special attention when installing aftermarket stereos. These amplifiers often use proprietary signal protocols that aftermarket units cannot replicate. Bypassing the factory amp by running new speaker wires directly from the stereo to the speakers solves many compatibility issues.
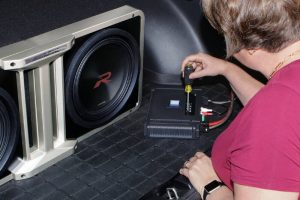
Locate the factory amplifier, typically mounted under a seat or in the trunk area. Identify the input signal wires and output speaker wires using a wiring diagram. Disconnect the output wires and run new wires from your aftermarket stereo directly to each speaker.
Signal Voltage Testing
Use an AC voltmeter to measure the signal voltage at the front left speaker terminals while playing audio. The voltage should fluctuate with music volume and content. Consistent voltage readings around 12 volts suggest crossover or amplifier problems, while no voltage indicates wiring failures.
Compare readings between working speakers and the problematic front left channel. Similar voltages at the stereo output but different voltages at the speaker suggest wire damage between those points.
Professional Diagnostic Tools
Advanced diagnostic equipment can identify complex problems that basic testing misses. Oscilloscopes show audio waveforms that reveal distortion, phase issues, and signal integrity problems. Signal generators help isolate problems by providing known test signals to each channel.
Professional installers use specialized tools like the AudioControl DM-810 to analyze factory amplifier systems and determine optimal integration methods. These tools save time and prevent damage that can occur with trial-and-error troubleshooting.
Fixing Wiring Problems
Proper Wire Splicing Techniques
When repairing damaged speaker wires, use proper splicing techniques to ensure reliable connections. Strip wire insulation carefully to avoid cutting copper strands. Twist the exposed wires together tightly and solder the joint for maximum conductivity.
Cover all solder joints with heat-shrink tubing to prevent corrosion and short circuits. Heat-shrink provides better protection than electrical tape, which can unwrap over time. Route repaired wires away from sharp edges and moving parts that could cause future damage.
Harness Adapter Solutions
Installing a proper wiring harness adapter prevents cutting factory wires and simplifies future stereo changes. These adapters plug into the factory radio connector and provide standard wire colors for aftermarket stereo installation.
Choose adapters specifically designed for your vehicle’s year, make, and model. Generic adapters often lack proper connections for premium audio systems or steering wheel controls. Quality adapters include detailed wiring diagrams that eliminate guesswork during installation.
Ground Connection Importance
Poor ground connections cause numerous car audio problems, including single-channel failures. The stereo requires a solid ground connection to the vehicle’s chassis to function properly. Clean the ground connection point to bare metal and secure the ground wire tightly.
Use a multimeter to verify ground continuity between the stereo case and various chassis points. High resistance in the ground circuit can cause erratic operation and speaker channel failures.
Speaker-Related Solutions
Speaker Impedance Matching
Aftermarket stereos expect speakers with specific impedance ratings, typically 4 ohms. Factory speakers might use different impedances that can overload or underload the stereo’s amplifier circuits. Mismatched impedance often affects individual channels differently.
Check your speaker specifications against the stereo’s requirements. Replace speakers if impedance mismatches exist, or add impedance-matching devices to correct the load. Proper impedance matching ensures optimal power transfer and prevents amplifier damage.
Crossover Network Issues
Some vehicles use passive crossover networks that split audio frequencies between different drivers in multi-way speaker systems. These crossovers can fail over time, particularly the capacitors used in high-frequency circuits.
Bypass or replace suspected crossover networks to restore full-range audio to affected speakers. Simple speaker replacement often includes built-in crossovers that eliminate external network requirements.
Voice Coil Damage
Speaker voice coils can develop partial failures that only affect certain frequency ranges or volume levels. These failures might not show up in simple continuity tests but become apparent during normal operation.
Replace speakers showing signs of voice coil damage, such as scratchy sounds, reduced output, or intermittent operation. Attempting to repair voice coil damage rarely produces satisfactory long-term results.
Professional Installation Considerations
When to Seek Professional Help
Complex factory audio systems often require professional installation to maintain proper operation. Vehicles with fiber optic audio networks, multiple amplifiers, or advanced driver assistance systems need specialized knowledge for successful aftermarket integration.
Professional installers have access to vehicle-specific information and specialized tools that simplify complex installations. They also provide warranties on their work and can troubleshoot problems that arise after installation.
Cost-Benefit Analysis
Consider the cost of professional installation against the time and potential mistakes of DIY work. Professional installation typically costs $100-300 but includes proper wiring, testing, and problem resolution. Compare this cost against the potential expense of replacing damaged components due to incorrect installation.
Factor in the value of your time and the frustration of dealing with persistent audio problems. Professional installation often saves money in the long run by preventing costly mistakes and ensuring proper system operation.
Prevention and Maintenance Tips
Regular Connection Checks
Inspect stereo connections periodically, especially after driving on rough roads or experiencing extreme temperature changes. Vibration and thermal cycling can loosen connections over time, causing intermittent problems that worsen gradually.
Remove the stereo annually to check wiring harness connections and look for signs of corrosion or damage. Clean connections with electrical contact cleaner and ensure all joints remain tight.
Environmental Protection
Protect speaker wires from moisture, which can cause corrosion and connection failures. Seal door jamb wire passages with rubber boots or grommets to prevent water intrusion. Use marine-grade wire in areas exposed to moisture.
Keep speakers clean and dry to prevent cone damage and voice coil corrosion. Replace door speakers showing signs of water damage before they fail completely and potentially damage your stereo.
Conclusion
Single-channel speaker failures in aftermarket stereo installations usually result from correctable wiring or compatibility issues. Systematic troubleshooting helps identify the root cause and guides you toward the appropriate solution. Start with simple checks like balance settings and connection inspection before moving to more complex diagnostic procedures.
Remember that modern vehicles often include sophisticated factory audio systems that require special consideration during aftermarket installation. When in doubt, consult with professional installers who have experience with your specific vehicle type. Proper installation and regular maintenance ensure years of reliable operation from your aftermarket car stereo system.
Taking time to understand your vehicle’s audio system and following proper installation procedures prevents most speaker channel failures. With patience and the right approach, you can restore full audio functionality and enjoy the enhanced features your new aftermarket stereo provides.