The Toyota Tundra stands tall as a rugged, reliable truck built for adventure, work, and everything in between. But let’s face it: the factory stereo system in many Tundra models leaves much to be desired. Thin sound, limited bass, and outdated features can make long drives feel dull. Upgrading your Tundra’s stereo system breathes new life into your driving experience, delivering crystal-clear audio, powerful bass, and modern connectivity. This guide walks you through the process of upgrading your Toyota Tundra’s stereo, offering step-by-step advice, expert tips, and recommendations to achieve premium sound. Whether you’re a music enthusiast or simply want better audio for podcasts, this transformation elevates every moment behind the wheel.
Contents
- Why Upgrade Your Toyota Tundra’s Stereo System?
- Step-by-Step Guide to Upgrading Your Toyota Tundra Stereo
- Top Toyota Tundra Stereo Upgrade Kits for 2025
- Common Mistakes to Avoid During a Stereo Upgrade
- Professional Installation vs. DIY: Which Is Right for You?
- Best Brands for Toyota Tundra Stereo Upgrades
- Enhancing Your Tundra’s Audio Experience Beyond the Stereo
- Toyota Tundra Stereo Upgrade Costs: What to Expect
- FAQs About Toyota Tundra Stereo Upgrades
- Conclusion: Elevate Your Toyota Tundra with a Stellar Stereo Upgrade
Why Upgrade Your Toyota Tundra’s Stereo System?
Factory stereos in Toyota Tundras, especially in older models (2007–2021), often lack the depth and clarity modern drivers crave. Stock systems typically feature basic speakers, limited power output, and outdated technology like single-DIN head units or minimal touchscreen functionality. Upgrading your stereo system offers several benefits that enhance your driving experience:
- Superior Sound Quality: Aftermarket speakers, subwoofers, and amplifiers deliver richer bass, sharper highs, and balanced mids for an immersive listening experience.
- Modern Connectivity: New head units support Apple CarPlay, Android Auto, Bluetooth, and USB inputs, keeping you connected on the go.
- Customization: Tailor your audio setup to your preferences, whether you prioritize bass-heavy hip-hop or crisp acoustics for classical music.
- Increased Vehicle Value: A high-quality audio system adds appeal to your Tundra, making it stand out in the used truck market.
Before diving into the upgrade process, consider your goals. Do you want a full overhaul with a subwoofer and amplifier, or are you looking for a simple head unit swap? Your budget, skill level, and audio preferences shape the path forward.
Step-by-Step Guide to Upgrading Your Toyota Tundra Stereo
Transforming your Tundra’s audio system requires planning, the right components, and a clear installation process. Below, we break down the steps to upgrade your stereo, ensuring you achieve professional-grade results without breaking the bank.
Step 1: Assess Your Current Stereo System
Start by evaluating your Tundra’s existing audio setup. Different model years and trims (SR, SR5, Limited, Platinum, 1794 Edition) come with varying stereo configurations. For example, higher trims like the Platinum or 1794 Edition may include a JBL premium audio system, while base models feature basic 6-speaker setups.
To assess your system:
- Check the head unit: Is it a single-DIN or double-DIN? Does it have a touchscreen or basic display?
- Inspect the speakers: Most Tundras have 6–10 speakers, including door speakers and tweeters. Note their size (typically 6×9” in front doors, 6.5” in rear doors).
- Identify extras: Does your truck have a factory subwoofer or amplifier? JBL-equipped models often include these.
Understanding your starting point helps you choose compatible components. For instance, replacing a JBL system requires components that match its wiring harness and power output.
Step 2: Set a Budget and Define Your Goals
Stereo upgrades range from budget-friendly speaker swaps to high-end systems costing thousands. Decide what you want:
- Basic Upgrade ($200–$500): Replace the head unit and speakers for improved sound and connectivity.
- Mid-Range Upgrade ($500–$1,500): Add an amplifier and subwoofer for deeper bass and louder output.
- Premium Upgrade ($1,500+): Install a custom system with high-end components, including a DSP (digital signal processor) for fine-tuned audio.
Your budget determines the brands and components you choose. Popular brands like Pioneer, Kenwood, Alpine, and JL Audio offer reliable options across price points.
Step 3: Choose the Right Components
Selecting the right components ensures your new system sounds great and integrates seamlessly with your Tundra. Here’s a breakdown of key parts:
Head Unit
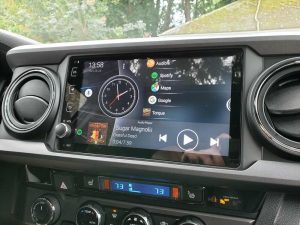
The head unit serves as the control center for your stereo. Modern double-DIN head units offer touchscreens, smartphone integration, and advanced features. Top picks for Tundra owners include:
- Pioneer DMH-WT8600NEX: A 10.1” floating touchscreen with Apple CarPlay, Android Auto, and Bluetooth.
- Kenwood Excelon DMX907S: A 6.95” display with wireless connectivity and customizable sound settings.
- Alpine iLX-W650: A compact 7” unit with a shallow chassis, ideal for tight dashboards.
Ensure the head unit fits your Tundra’s dashboard. Most 2007–2021 models accept double-DIN units with a mounting kit. For newer 2022+ Tundras, verify compatibility with the larger factory touchscreen.
Speakers
Upgrading your door speakers dramatically improves sound clarity. Look for component speakers (separate woofers and tweeters) or coaxial speakers for easier installation. Recommended brands:
- Focal Performance PS 165 F3: Premium component speakers with crisp highs and punchy mids.
- JL Audio C2-650: Balanced sound with excellent bass response.
- Rockford Fosgate R165X3: Budget-friendly coaxial speakers with solid performance.
Match speaker sizes to your Tundra’s factory setup (6×9” front, 6.5” rear). Check power handling to ensure compatibility with your head unit or amplifier.
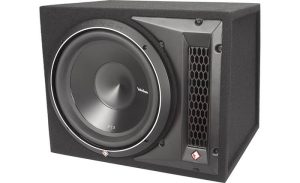
Subwoofer
A subwoofer adds depth to your audio, perfect for bass-heavy genres. Compact subwoofers fit under the rear seat of crew cab Tundras. Top choices:
- JL Audio 10W3v3-4: A 10” subwoofer with powerful, tight bass.
- Alpine S-W8D4: An 8” sub for smaller spaces without sacrificing impact.
- **Kicker CompC 10”: Affordable and punchy, ideal for budget builds.
Consider a powered subwoofer (with a built-in amp) for simpler installation.
Amplifier
An amplifier boosts your system’s power, driving speakers and subwoofers to their full potential. Look for compact amps that fit under seats or in the trunk:
- Alpine BBX-T600: A 4-channel amp for speakers and subwoofers.
- JL Audio JD400/4: Clean power for a full system.
- Rockford Fosgate R500X1D: A mono amp for subwoofers.
Match the amp’s power output to your speakers’ RMS ratings to avoid distortion.
Wiring and Accessories
Don’t skimp on wiring. Quality wiring kits, adapters, and sound deadening materials ensure clean installation and optimal performance:
- Metra Wiring Harness: Matches your Tundra’s factory wiring for plug-and-play installation.
- Sound Deadening Mats (e.g., Dynamat): Reduces road noise and vibrations for clearer sound.
- Speaker Adapters: Aligns aftermarket speakers with factory mounting points.
Step 4: Gather Tools and Prepare for Installation
Installing a stereo system requires basic tools and patience. Gather these essentials:
- Screwdrivers (Phillips and flathead)
- Panel removal tools (plastic pry tools to avoid damaging trim)
- Socket wrench set (for speaker and amp mounting)
- Wire cutters/strippers
- Crimping tool
- Multimeter (to test connections)
- Electrical tape and zip ties
Before starting, disconnect your Tundra’s battery to prevent electrical issues. Review your components’ manuals for specific wiring diagrams and installation steps.
Step 5: Install the New Stereo System
Follow these steps for a clean, professional installation:
Remove the Factory Head Unit
- Pry off the dash trim: Use a plastic pry tool to remove the trim around the head unit. Start at the edges and work carefully to avoid scratches.
- Unscrew the head unit: Remove the screws securing the factory unit. Keep them for the new unit.
- Disconnect wiring: Unplug the factory harness and antenna. Use a Metra adapter to connect the new head unit to the factory wiring.
- Install the new head unit: Secure the aftermarket unit with a mounting kit. Connect all wiring, then test before reattaching the trim.
Replace the Speakers
- Remove door panels: Unscrew and pry off the door panels. Be gentle to avoid breaking clips.
- Swap speakers: Disconnect the factory speakers and install aftermarket ones using adapters. Secure with screws or brackets.
- Test and reassemble: Play audio to ensure the speakers work, then reattach the door panels.
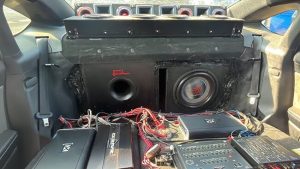
Install the Subwoofer and Amplifier
- Mount the subwoofer: Place it under the rear seat or in the trunk. Secure it to prevent movement.
- Wire the amp: Run power cables from the battery (through a fuse) to the amp. Connect ground wires to a clean metal surface. Route RCA cables from the head unit to the amp.
- Connect the subwoofer: Link it to the amp with speaker wire. Test the setup before securing all components.
Apply Sound Deadening
Add sound deadening mats to door panels, the trunk, and the subwoofer enclosure. This reduces rattles and enhances audio clarity.
Step 6: Tune and Test Your System
Once installed, fine-tune your system for optimal sound:
- Adjust the head unit: Use equalizer settings to balance bass, mids, and treble. Enable crossovers to direct frequencies to the right speakers.
- Set amp gains: Use a multimeter to adjust amplifier gains, preventing clipping and distortion.
- Test all components: Play various music genres to ensure clarity and balance. Check for rattles or loose connections.
If your system includes a DSP, use its software to customize sound profiles for different genres or passengers.
Step 7: Maintain Your New Stereo System
Keep your audio system in top shape with regular maintenance:
- Clean components: Dust speakers and the head unit to prevent buildup.
- Check connections: Inspect wiring annually for wear or loose connections.
- Update firmware: Download updates for your head unit to maintain compatibility with smartphones and apps.
Top Toyota Tundra Stereo Upgrade Kits for 2025
For those seeking a plug-and-play solution, pre-built stereo upgrade kits simplify the process. These kits include matched components designed for Tundra models. Here are top picks for 2025:
- Crutchfield Toyota Tundra Audio Package: Includes a Kenwood head unit, Focal speakers, and a compact subwoofer. Price: ~$800.
- JL Audio Tundra Stealthbox System: A custom-fit subwoofer and amp combo for crew cab models. Price: ~$1,200.
- Alpine Restyle Tundra Bundle: Features a 9” touchscreen head unit, component speakers, and a powered sub. Price: ~$2,000.
Check compatibility with your Tundra’s year and trim before purchasing.
Common Mistakes to Avoid During a Stereo Upgrade
Even seasoned DIYers make mistakes. Steer clear of these pitfalls:
- Skipping sound deadening: Without mats, road noise and vibrations muddy your audio.
- Mismatching components: Ensure speakers, amps, and the head unit have compatible power ratings.
- Poor wiring: Cheap cables cause signal loss or electrical issues. Use high-quality wiring kits.
- Rushing installation: Take time to secure components and test connections to avoid costly fixes.
Professional Installation vs. DIY: Which Is Right for You?
Deciding between DIY and professional installation depends on your skills and goals:
- DIY: Saves money and offers a rewarding project. Ideal for those with basic electrical knowledge and time to spare. Expect 4–8 hours for a full install.
- Professional: Ensures flawless results, especially for complex systems with DSPs or custom enclosures. Costs $200–$1,000, depending on the setup.
If you’re unsure, start with a simple upgrade (e.g., speakers and head unit) yourself, then hire a pro for advanced components like subwoofers or amplifiers.
Best Brands for Toyota Tundra Stereo Upgrades
Choosing trusted brands guarantees durability and performance. Here are top brands for Tundra audio upgrades:
- Pioneer: Known for user-friendly head units with vibrant displays.
- Focal: Delivers audiophile-grade speakers with exceptional clarity.
- JL Audio: Excels in subwoofers and amps for powerful bass.
- Alpine: Offers versatile head units and compact subwoofers.
- Rockford Fosgate: Budget-friendly yet reliable for entry-level upgrades.
Read reviews and compare specs to find the best fit for your Tundra.
Enhancing Your Tundra’s Audio Experience Beyond the Stereo
A stereo upgrade is just the start. Elevate your Tundra’s audio environment with these additions:
- Soundproofing: Add extra sound deadening to the cabin floor and firewall for a quieter ride.
- Custom Enclosures: Build a tailored subwoofer box for optimal bass response.
- Ambient Lighting: Install LED strips synced to music for a dynamic vibe.
- Backup Camera Integration: Pair your new head unit with a rearview camera for added safety.
Toyota Tundra Stereo Upgrade Costs: What to Expect
Budgeting for your upgrade helps you avoid overspending. Here’s a cost breakdown:
- Head Unit: $100–$800
- Speakers: $50–$500 per pair
- Subwoofer: $100–$600
- Amplifier: $100–$700
- Wiring and Accessories: $50–$200
- Professional Installation (optional): $200–$1,000
Total costs range from $200 for a basic setup to $3,000+ for a premium system. Shop sales or bundles to save.
FAQs About Toyota Tundra Stereo Upgrades
Q: Will upgrading my stereo void my Tundra’s warranty?
A: No, upgrading your stereo doesn’t void the vehicle warranty, but improper installation could damage components. Follow guides or hire a professional to avoid issues.
Q: Can I keep my factory JBL system and add a subwoofer?
A: Yes, you can integrate a subwoofer with the JBL system using a line output converter to tap into the factory amp’s signal.
Q: How long does a stereo upgrade take?
A: A basic upgrade (head unit and speakers) takes 2–4 hours. A full system with a subwoofer and amp may take 6–8 hours.
Q: Do I need an amplifier for new speakers?
A: Not always. A powerful head unit can drive aftermarket speakers, but an amp improves volume and clarity, especially for subwoofers.
Conclusion: Elevate Your Toyota Tundra with a Stellar Stereo Upgrade
Upgrading your Toyota Tundra’s stereo system transforms your truck into a rolling concert hall. From thumping bass to crystal-clear vocals, a custom audio setup enhances every drive, whether you’re tackling off-road trails or cruising highways. By choosing the right components, planning your installation, and avoiding common mistakes, you create a system that rivals professional builds. Start small with a new head unit and speakers, or go all-in with a subwoofer and amplifier—the choice is yours. With this guide, you’re equipped to build a stereo system that matches your Tundra’s rugged spirit and your love for great sound.
Ready to get started? Browse top brands, set your budget, and turn your Toyota Tundra into the ultimate audio experience.