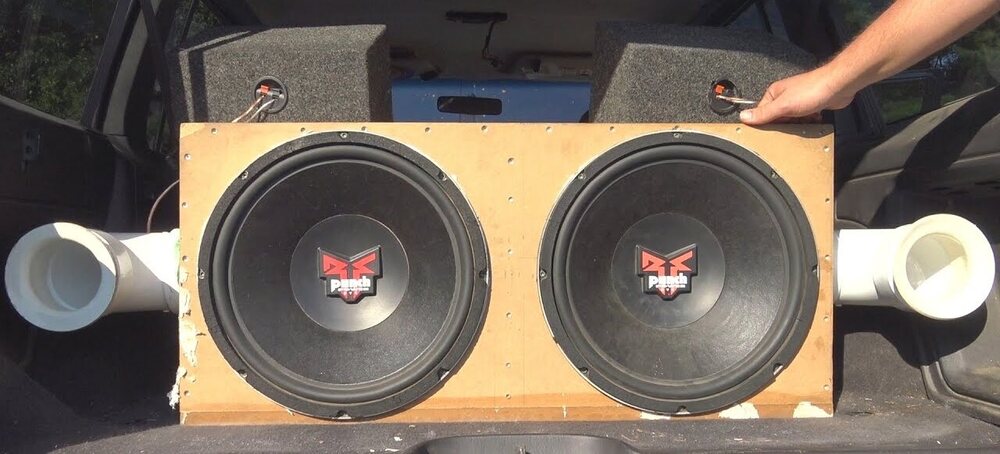
Transforming a sealed subwoofer box into a ported one can elevate your car audio system to new heights. A ported sub box, also known as a vented enclosure, allows for deeper bass and louder output compared to a sealed box. By adding a port, you improve airflow, which enhances the subwoofer’s efficiency and delivers a punchier sound. If you’re ready to upgrade your audio experience, this guide walks you through the process of porting a sealed sub box with clear, actionable steps. Let’s dive into how you can achieve booming bass without breaking the bank.
Contents
- Why Port a Sealed Sub Box?
- Tools and Materials You’ll Need
- Step 1: Calculate the Port Size and Length
- Step 2: Plan the Port Placement
- Step 3: Cut the Port Hole
- Step 4: Install the Port
- Step 5: Reinforce the Box
- Step 6: Test the Subwoofer
- Step 7: Fine-Tune and Enjoy
- Common Mistakes to Avoid
- Benefits of a Ported Sub Box
- When to Stick with a Sealed Box
- Final Thoughts
Why Port a Sealed Sub Box?
Before starting, understand why porting matters. A sealed subwoofer box produces tight, accurate bass but often lacks the volume and depth of a ported design. Ported enclosures use a vent to channel air, creating a resonant frequency that boosts low-end output. This makes them ideal for listeners who crave powerful, rumbling bass for genres like hip-hop, EDM, or rock.
Porting also increases efficiency. The subwoofer moves less to produce the same volume, reducing strain on your amplifier. However, ported boxes require precise calculations to avoid issues like port noise or poor sound quality. With the right approach, you can customize your sealed box for optimal performance.
Tools and Materials You’ll Need
Gather these tools and materials to ensure a smooth process:
- Jigsaw or circular saw
- Drill with various bits
- Measuring tape or ruler
- Marker or pencil
- PVC pipe or port tube (size depends on calculations)
- Wood glue
- Silicone sealant
- Sandpaper
- Screwdriver
- Screws or brackets (for securing the port)
- Calculator or port length calculator app
- Safety gear (gloves, goggles, dust mask)
Having everything ready saves time and prevents interruptions during the project.
Step 1: Calculate the Port Size and Length
Precision is critical when porting a subwoofer box. The port’s size and length determine the tuning frequency, which affects the bass response. Start by gathering key information about your subwoofer and box:
- Subwoofer specifications: Check the manufacturer’s recommended tuning frequency (often between 30-40 Hz for car audio).
- Box volume: Measure the internal dimensions of your sealed box (length x width x height in inches) and convert to cubic feet (divide by 1728).
- Port diameter: Common sizes range from 2 to 6 inches, depending on the subwoofer size and box volume.
Use an online port calculator or the following formula to determine port length:
Port Length (L) = [(1.463 x 10^7 x R^2) / (Fb^2 x Vb)] – (0.823 x √R)
Where:
- R = port radius (half the diameter)
- Fb = desired tuning frequency (in Hz)
- Vb = internal box volume (in cubic feet)
For example, a 1.5-cubic-foot box with a 4-inch diameter port and a 35 Hz tuning frequency requires a port length of approximately 10-12 inches. Double-check calculations to avoid errors. A poorly sized port can cause chuffing (port noise) or weak bass.
Step 2: Plan the Port Placement
Decide where to place the port on your subwoofer box. The port should have enough clearance from internal walls and the subwoofer itself to allow smooth airflow. A general rule is to keep the port at least one port diameter away from any wall or obstruction inside the box.
Consider these placement tips:
- Place the port on the same side as the subwoofer for a compact design.
- Avoid corners to prevent turbulence.
- Ensure the port doesn’t interfere with mounting hardware or wiring.
Mark the port’s location with a pencil or marker. If using a round port, trace the PVC pipe’s outline. For a slot port, draw a rectangular shape based on your calculations.
Step 3: Cut the Port Hole
Safety first—put on gloves, goggles, and a dust mask. Use a drill to create a starter hole inside the marked outline. Then, carefully cut along the outline with a jigsaw or circular saw. Take your time to ensure a clean, precise cut. Jagged edges can weaken the seal or cause air leaks.
After cutting, sand the edges with sandpaper to smooth them out. Test-fit the port tube in the hole. It should fit snugly without excessive gaps. If the hole is slightly too small, sand or trim until the port fits perfectly.
Step 4: Install the Port
For a round port, insert the PVC pipe or port tube into the hole. Ensure the pipe extends the correct length inside the box, as calculated in Step 1. Secure the port with wood glue around the edges to create an airtight seal. For added stability, use screws or brackets to hold the port in place.
If building a slot port, construct it using MDF or plywood cut to the calculated dimensions. Assemble the port walls inside the box, securing them with wood glue and screws. Apply silicone sealant along all seams to prevent air leaks, which can degrade sound quality.
Let the glue and sealant dry for at least 24 hours. Check for gaps or weak spots and reinforce as needed.
Step 5: Reinforce the Box
Adding a port changes the box’s internal dynamics, which may weaken its structure. Strengthen the enclosure by adding bracing or extra wood supports inside. Use wood glue and screws to attach braces across the box’s interior, focusing on areas near the port and subwoofer.
Inspect the box for loose joints or cracks. Apply additional sealant or glue to ensure the enclosure remains airtight. A sturdy box prevents vibrations and rattling, preserving sound clarity.
Step 6: Test the Subwoofer
Reinstall the subwoofer in the box, ensuring all connections are secure. Place the box in your vehicle and connect it to your amplifier. Play music with heavy bass to test the ported enclosure. Listen for clear, deep bass without distortion or port noise.
If you hear chuffing (a puffing sound from the port), the port may be too small or improperly tuned. Recalculate the port size or adjust its length by adding a flared end to reduce turbulence. If the bass sounds boomy or loose, the tuning frequency may be too low—shorten the port slightly and retest.
Step 7: Fine-Tune and Enjoy
Fine-tuning ensures your ported sub box performs at its best. Experiment with different tuning frequencies by adjusting the port length. For example, a shorter port raises the tuning frequency, producing punchier bass, while a longer port lowers it for deeper tones.
Adjust your amplifier settings, such as the low-pass filter and gain, to match the ported box’s characteristics. Move the box around your vehicle to find the spot with the best bass response—typically the trunk or rear cargo area.
Once satisfied, sit back and enjoy your upgraded audio system. The added power and depth will make every drive feel like a concert.
Common Mistakes to Avoid
Porting a sealed sub box requires attention to detail. Steer clear of these pitfalls:
- Incorrect calculations: Double-check port size and length to avoid poor sound quality.
- Air leaks: Seal all joints thoroughly to maintain pressure inside the box.
- Weak box structure: Reinforce the enclosure to handle increased vibrations.
- Overcomplicating the design: Stick to simple round or slot ports unless you’re an experienced builder.
Benefits of a Ported Sub Box
A ported subwoofer box offers several advantages:
- Louder bass: The port amplifies low frequencies, filling your car with sound.
- Deeper tones: Ported designs excel at reproducing sub-bass frequencies.
- Efficiency: Your subwoofer works less, extending its lifespan and reducing amp strain.
- Customization: Adjust the port for different music styles or preferences.
When to Stick with a Sealed Box
Ported boxes aren’t for everyone. If you prefer tight, accurate bass for genres like jazz or classical, a sealed box may suit you better. Sealed enclosures are also smaller and easier to build, making them ideal for compact vehicles or beginners. Evaluate your music tastes and vehicle space before committing to porting.
Final Thoughts
Porting a sealed sub box unlocks a world of powerful, rumbling bass that transforms your car audio experience. By following these steps—calculating the port size, cutting precisely, sealing thoroughly, and testing carefully—you can build a ported enclosure that rivals professional designs. Take your time, prioritize accuracy, and don’t skip reinforcements to ensure durability.
With your newly ported sub box, every song will hit harder and sound richer. Whether you’re cruising down the highway or parked at a car show, your audio system will turn heads. Grab your tools, crank up the motivation, and start building today—your ears will thank you.


