Upgrading the audio system in your classic car breathes new life into your driving experience. Old cars often come with outdated or nonfunctional stereos, leaving you stuck with static-filled AM/FM radio or no sound at all. Installing a modern car stereo enhances sound quality, adds Bluetooth connectivity, and integrates features like USB ports or smartphone compatibility. This guide walks you through the process of installing a car stereo in an older vehicle, ensuring you achieve a seamless upgrade without compromising your car’s vintage charm. By following these steps, you’ll enjoy crystal-clear audio and modern conveniences in your classic ride.
Contents
- Why Upgrade Your Old Car’s Stereo?
- Tools and Materials You’ll Need
- Step 1: Disconnect the Battery
- Step 2: Remove the Old Stereo
- Step 3: Prepare the New Stereo
- Step 4: Connect the Wiring
- Step 5: Mount the New Stereo
- Step 6: Reconnect the Battery and Test
- Step 7: Secure and Finalize the Installation
- Tips for a Successful Installation
- Common Challenges and Solutions
- Enhancing Your Classic Car’s Audio Experience
- Maintaining Your New Stereo
- Conclusion
Why Upgrade Your Old Car’s Stereo?
Before diving into the installation process, consider why upgrading your car’s stereo matters. Classic cars, typically from the 1970s, 1980s, or earlier, often feature basic audio systems that lack the power and clarity of modern units. A new stereo delivers improved sound quality, supports auxiliary inputs, and offers features like hands-free calling or streaming music from your phone. Beyond functionality, a well-chosen stereo maintains the aesthetic of your vintage vehicle, blending retro style with cutting-edge technology.
This project also appeals to DIY enthusiasts who enjoy hands-on work. With the right tools, preparation, and patience, you can complete the installation in a few hours. The process involves removing the old unit, wiring the new stereo, and ensuring everything fits perfectly. Let’s break it down step by step to make your classic car’s audio system roar to life.
Tools and Materials You’ll Need
Preparation sets the stage for a smooth installation. Gather these tools and materials before starting to avoid interruptions:
- Screwdrivers: Phillips and flathead for removing screws and panels.
- Wire cutters/strippers: For trimming and preparing wires.
- Crimping tool: To secure wire connections.
- Socket wrench set: For loosening bolts or nuts in tight spaces.
- Torx drivers: Some older cars use Torx screws in dashboards.
- Pry tools: Plastic trim removal tools prevent damage to delicate panels.
- Multimeter: To test electrical connections.
- New car stereo: Choose a single-DIN or double-DIN unit compatible with your car.
- Wiring harness adapter: Matches your car’s wiring to the new stereo.
- Dash kit: Ensures the stereo fits securely in the dashboard.
- Antenna adapter: Connects the car’s antenna to the new unit.
- Electrical tape: Insulates exposed wires.
- Zip ties: Organizes loose wires for a clean setup.
Check your car’s make, model, and year to confirm compatibility with the stereo and adapters. Many auto parts stores or online retailers provide fitment guides to simplify this process. With your tools and materials ready, you’re set to begin.
Step 1: Disconnect the Battery
Safety comes first. Disconnect the negative terminal of your car’s battery to prevent electrical shocks or short circuits. Use a socket wrench to loosen the terminal clamp, then pull it off and secure it away from the battery. This step ensures you work on the stereo system without risking damage to the new unit or your car’s electrical components.
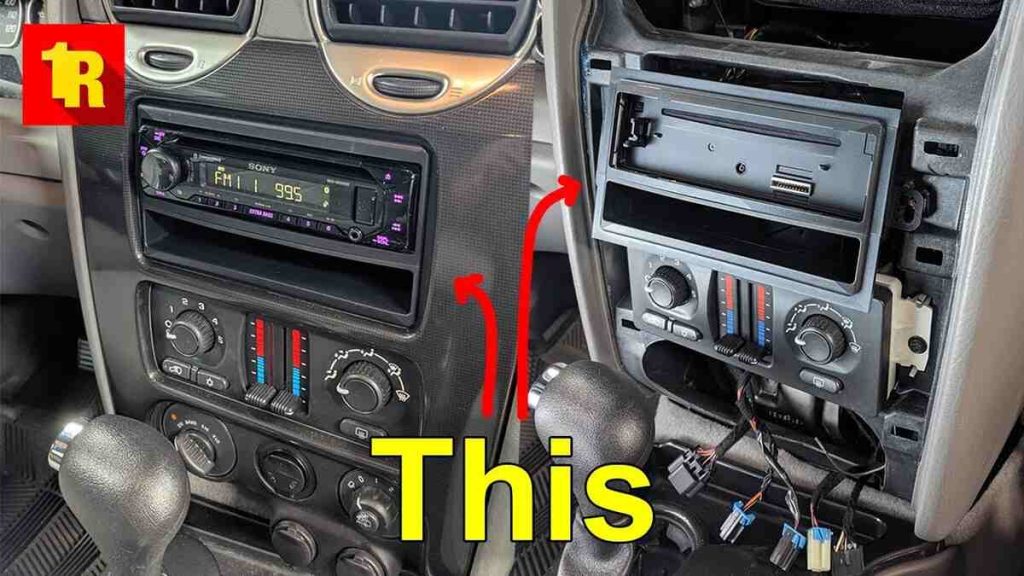
Step 2: Remove the Old Stereo
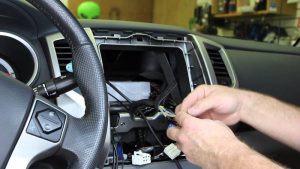
Next, remove the existing stereo. Older cars often have simpler dashboards, but the process varies depending on the vehicle. Start by inspecting the dashboard for screws, clips, or panels securing the stereo. Use a screwdriver or pry tool to carefully remove trim pieces or bezels around the stereo. Avoid forcing anything to prevent cracking fragile plastic or damaging upholstery.
Once you access the stereo, locate the mounting screws or bolts holding it in place. Unscrew them and gently pull the unit out. You’ll see a bundle of wires connected to the back, including the power, speaker, and antenna cables. Unplug these carefully, noting their positions for reference when installing the new unit. If the stereo resists, double-check for hidden screws or clips.
In some classic cars, the stereo may be part of a larger console. If so, consult your vehicle’s service manual for specific removal instructions. Taking photos during this step helps you remember how components fit together.
Step 3: Prepare the New Stereo
With the old unit out, prepare the new stereo for installation. Unbox the stereo and review the included manual for wiring diagrams and mounting instructions. Most modern stereos come with a detachable faceplate and a metal sleeve for mounting. Slide the sleeve into the dash kit (if required) and secure it according to the kit’s instructions.
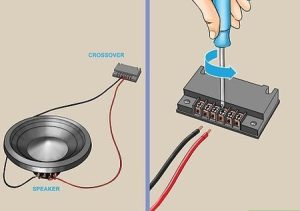
Now, connect the wiring harness adapter to the stereo’s wiring. The adapter simplifies the process by matching the stereo’s connectors to your car’s wiring. Line up the color-coded wires (e.g., red for power, black for ground, yellow for constant power) and use crimp connectors to join them securely. Wrap each connection with electrical tape to prevent short circuits. If your stereo includes additional features like a microphone for Bluetooth, set it aside for later installation.
Test the antenna adapter by plugging it into the stereo’s antenna port. Ensure it fits snugly to guarantee clear radio reception. Organizing these components now saves time during the final installation.
Step 4: Connect the Wiring
Wiring forms the backbone of your new stereo system. Locate the car’s wiring harness, which you disconnected from the old unit. Plug the wiring harness adapter into the car’s harness, ensuring a firm connection. If your vehicle lacks a standard harness (common in very old cars), you may need to splice wires manually. Use a multimeter to identify the car’s power, ground, and speaker wires, then connect them to the stereo’s wires using crimp connectors.
Pay close attention to the speaker wires. Older cars may have two or four speakers, each with positive and negative terminals. Match these to the stereo’s corresponding wires (often labeled as front left, front right, rear left, rear right). Incorrect wiring can cause poor sound quality or damage the speakers.
After connecting the wires, use zip ties to bundle them neatly. This prevents loose wires from rattling or interfering with other components. Double-check all connections before proceeding to avoid issues later.
Step 5: Mount the New Stereo
Slide the new stereo into the dashboard opening or dash kit. If using a dash kit, ensure it aligns with the car’s mounting points. Secure the stereo with the provided screws or clips, but don’t overtighten, as this can strip threads or crack the mounting frame. Push the stereo in until it sits flush with the dashboard for a clean, professional look.
If your car’s dashboard has a larger opening than the new stereo, the dash kit fills the gap. Some kits require trimming or sanding for a perfect fit, so test the setup before finalizing. For a retro aesthetic, consider a stereo with a vintage-style faceplate that complements your classic car’s interior.
Step 6: Reconnect the Battery and Test
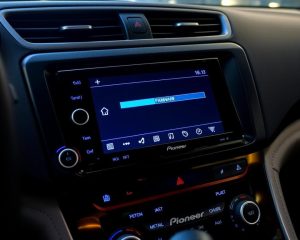
Reconnect the negative battery terminal and tighten it securely. Turn on the car’s ignition to test the stereo. Power it on and check all functions: radio, Bluetooth, USB, auxiliary input, and speakers. Tune the radio to confirm the antenna works, and pair your phone via Bluetooth to test streaming and hands-free features. Adjust the balance and fade settings to ensure all speakers produce sound.
If the stereo doesn’t power on, check the wiring connections and fuses. A blown fuse in the car’s fuse box or the stereo’s inline fuse could be the culprit. If the sound is distorted, verify that the speaker wires are correctly connected. Troubleshoot any issues before moving forward.
Step 7: Secure and Finalize the Installation
Once the stereo works perfectly, secure any loose wires with zip ties and tuck them behind the dashboard. Reattach any trim panels, bezels, or screws you removed earlier. Ensure all components snap back into place without gaps or rattles. If you installed a Bluetooth microphone, mount it in a discreet location, like near the driver’s visor, for clear voice pickup.
Take a moment to clean the dashboard and stereo faceplate, removing fingerprints or dust. Step back and admire your work—a modern audio system that enhances your classic car’s driving experience.
Tips for a Successful Installation
To make your project even smoother, keep these tips in mind:
- Choose the right stereo: Single-DIN stereos fit most older cars, while double-DIN units may require dashboard modifications. Research models with retro designs for a cohesive look.
- Consult your car’s manual: Vintage cars have unique wiring and mounting setups. A service manual provides valuable insights.
- Test before finalizing: Always test the stereo before reassembling the dashboard to catch issues early.
- Consider sound upgrades: While installing the stereo, think about adding new speakers or a small amplifier for better audio quality.
- Work patiently: Rushing can lead to damaged panels or incorrect wiring. Take your time for a professional result.
Common Challenges and Solutions
Installing a stereo in an old car can present challenges. Here are some common issues and how to address them:
- Incompatible wiring: If your car’s wiring doesn’t match the new stereo, use a wiring harness adapter or consult a professional for custom splicing.
- Dashboard fitment issues: Older dashboards may not accommodate modern stereos. A custom dash kit or minor trimming resolves this.
- Weak sound output: If the audio sounds tinny, check speaker connections or consider upgrading to higher-quality speakers.
- Electrical interference: Loose or exposed wires can cause static or buzzing. Insulate all connections and route wires away from other electronics.
Enhancing Your Classic Car’s Audio Experience
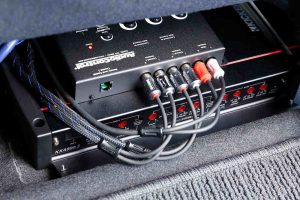
Beyond the stereo, consider complementary upgrades to elevate your audio system. Installing new speakers in the doors or rear deck improves sound clarity. A compact subwoofer adds bass without overwhelming the car’s interior. If your budget allows, an amplifier boosts power to the speakers, delivering richer sound. These additions transform your classic car into a rolling concert hall while preserving its nostalgic appeal.
Maintaining Your New Stereo
To keep your stereo performing at its best, maintain it properly. Dust the faceplate regularly to prevent buildup in buttons or ports. Avoid overloading the system with high volumes for extended periods, as this can strain the speakers. If you park your classic car for long periods, disconnect the battery to prevent draining from the stereo’s standby power.
Conclusion
Installing a car stereo in an old car blends modern technology with vintage style, creating an enjoyable driving experience. By following this step-by-step guide, you’ve learned how to remove the old unit, wire and mount the new stereo, and troubleshoot common issues. With the right tools, preparation, and patience, you’ve upgraded your classic car’s audio system like a pro. Now, hit the road, crank up your favorite tunes, and enjoy the perfect harmony of retro charm and cutting-edge sound.