If you’re an audiophile or simply love music, then you know how crucial it is to have the right components and wiring for your sound system. Tweeters are an essential part of any sound system, but wiring them with a crossover can be a daunting task. In this article, we’ll guide you through the process of wiring tweeters with a crossover in a step-by-step manner.
What are Tweeters?
Tweeters are high-frequency speakers that are responsible for producing high-pitched sounds. They are smaller than the main speakers and are usually mounted at the top of the main speakers. Tweeters are used to reproduce sounds such as cymbals, bells, and other high-pitched sounds that are not well reproduced by larger speakers.
What is a Crossover?
A crossover is an electronic device that splits the audio signal into different frequency ranges and sends each frequency range to the appropriate speaker. A crossover is a crucial component of any sound system that has more than one speaker. It ensures that each speaker receives only the frequency range that it is designed to reproduce.
Steps for Wiring Tweeters with Crossover
Step 1: Gather the Materials
Before starting, you need to gather all the necessary materials. You will need tweeters, crossovers, speaker wires, a wire stripper, and crimp connectors. You may also need a soldering iron and solder if the connectors on your tweeters are not compatible with crimp connectors.
Step 2: Mount the Tweeters
Mount the tweeters in the desired location. Make sure to follow the manufacturer’s guidelines for installation.
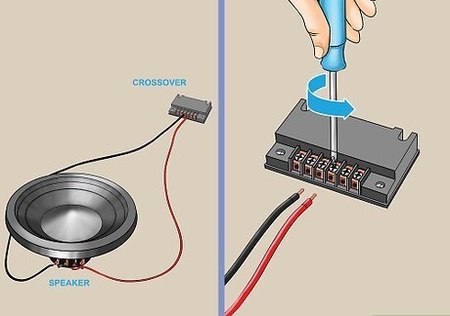
Step 3: Connect the Tweeter Wires to the Crossover
The tweeter will have two wires – a positive wire and a negative wire. Connect the positive wire from the tweeter to the positive terminal on the crossover. Connect the negative wire from the tweeter to the negative terminal on the crossover.
Step 4: Connect the Crossover to the Main Speaker Wires
Connect the wires from the main speaker to the crossover. The crossover will have two sets of wires – one for the tweeter and one for the main speaker. Connect the wires from the main speaker to the appropriate terminals on the crossover.
Step 5: Test the Sound System
After connecting all the wires, it’s time to test the sound system. Turn on the music and listen to the sound. If everything is working correctly, the tweeters should produce high-pitched sounds, and the main speakers should produce low-pitched sounds. If there are any issues, double-check the connections and wiring.
Why use a Crossover with Tweeters?
A crossover is an electronic circuit that separates an audio signal into different frequency ranges and sends each range to the appropriate speaker. In a multi-way speaker system, a crossover is used to ensure that each speaker only reproduces the frequency range that it is designed to handle.
In the case of tweeters, which are designed to produce high-frequency sounds, a crossover is essential to ensure that they only receive the high-frequency range of the audio signal. If a tweeter is connected directly to the amplifier without a crossover, it will receive the full audio spectrum, including the low-frequency range, which can cause distortion and damage the tweeter.
By using a crossover, the audio signal is divided into two or more frequency ranges, with the tweeter receiving only the high-frequency range. This ensures that the tweeter is not overloaded with frequencies it cannot handle, and the sound quality is improved. Additionally, using a crossover can help prevent phase issues and provide a more balanced frequency response across the audio spectrum.
Overall, using a crossover with tweeters is crucial for achieving a high-quality, accurate, and balanced sound system. It ensures that each speaker receives only the frequency range it is designed to handle, leading to improved sound quality and clarity.
Types of Crossovers for Tweeters
There are two main types of crossovers for tweeters: passive crossovers and active crossovers.
Passive Crossovers: Passive crossovers are the most common type of crossover used with tweeters. They are a simple circuit that is inserted between the amplifier and the speaker, and they work by using passive components like capacitors, inductors, and resistors to filter out unwanted frequencies. Passive crossovers are often pre-built into speaker systems, and they are simple to install, making them a popular choice for DIY projects.
One disadvantage of passive crossovers is that they can cause some signal loss due to their passive components. They also cannot be adjusted once they are installed, so they may not be the best option for audiophiles who want more precise control over their sound system.
Active Crossovers: Active crossovers are more complex than passive crossovers and require a power source to operate. They work by using electronic circuits to filter out unwanted frequencies and send the appropriate frequency range to the appropriate speaker. Active crossovers offer more precise control over the audio signal, and they can be adjusted to fine-tune the sound system’s frequency response.
One advantage of active crossovers is that they do not cause signal loss like passive crossovers. They also provide more flexibility and control over the audio signal, which is why they are often used in high-end audio systems. However, they are more complex to install and require a power source, making them a more expensive option compared to passive crossovers.
In summary, both passive and active crossovers can be used with tweeters. Passive crossovers are simpler and less expensive but offer less precise control over the audio signal. Active crossovers are more expensive and complex to install but offer more precise control and flexibility over the audio signal.
Conclusion
Wiring tweeters with a crossover can be intimidating for beginners, but it’s a straightforward process that anyone can learn. By following these steps, you can ensure that your tweeters are wired correctly and producing high-quality sound. Remember to take your time and double-check your work to avoid any issues.