Upgrading your vehicle’s audio system with an Android car stereo transforms your driving experience. These advanced head units deliver GPS navigation, music streaming, hands-free calling, and app integration, turning your dashboard into a smart hub. Installing one yourself saves money and adds a rewarding DIY achievement. This comprehensive guide walks you through the process, ensuring a smooth installation. Follow these steps to enjoy a feature-packed infotainment system tailored to your needs.
Contents
- Why Choose an Android Car Stereo?
- Tools and Materials You’ll Need
- Step 1: Disconnect the Car Battery
- Step 2: Remove the Factory Stereo
- Step 3: Prepare the Wiring Harness
- Step 4: Mount the Android Car Stereo
- Step 5: Test the Stereo
- Step 6: Secure and Reassemble
- Tips for a Professional Installation
- Common Challenges and Solutions
- Benefits of a DIY Installation
- Maintaining Your Android Car Stereo
- Choosing the Right Android Car Stereo
- Enhancing Your Audio System
- Legal and Safety Considerations
- Wrapping Up
Why Choose an Android Car Stereo?
Android car stereos elevate in-car entertainment. They run on the Android operating system, offering a familiar interface for smartphone users. You gain access to apps like Google Maps, Spotify, and Waze, enhancing navigation and media options. Voice recognition ensures safer driving by letting you control functions hands-free. Many units support Wi-Fi, enabling app downloads and web browsing. For older vehicles, this upgrade adds modern tech without buying a new car.
Before diving in, confirm your car’s compatibility. Check the make, model, and year to ensure the stereo fits your dashboard. Single-DIN and double-DIN units suit different vehicles, so measure your current stereo’s slot. A proper fit prevents installation headaches and ensures a sleek look.
Tools and Materials You’ll Need
Preparation sets the stage for success. Gather these tools and materials to streamline the process:
- Screwdriver set: Include Phillips and flathead screwdrivers for various screws.
- Trim removal tool: A nylon tool prevents damage to your dashboard.
- Wire crimper or soldering iron: Secures wiring connections.
- Wire strippers: Prepares wires for clean connections.
- Electrical tape: Insulates exposed wires.
- Wiring harness adapter: Matches your car’s wiring to the new stereo.
- Android car stereo unit: Choose a model compatible with your vehicle.
- Fitting kit: Includes brackets and mounts for a secure fit.
- Socket wrench set: Removes bolts holding the old stereo.
- Multimeter: Tests electrical connections for accuracy.
Having everything ready saves time and reduces frustration. A well-lit, clutter-free workspace also helps. Use your smartphone as a flashlight for tight spots, or invest in LED strip lights for better visibility.
Step 1: Disconnect the Car Battery
Safety comes first. Disconnect the negative terminal of your car’s battery to avoid electrical shocks or damage to the new stereo. Use a socket wrench to loosen the terminal, then set it aside. This step protects your vehicle’s electrical system and ensures a safe working environment. Take a moment to double-check that the power is off before proceeding.
Step 2: Remove the Factory Stereo
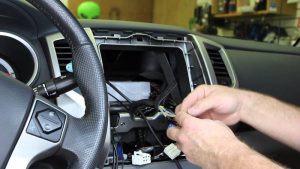
Now, clear the stage for your new Android head unit. Start by removing the dashboard trim surrounding the existing stereo. Use a nylon trim removal tool to gently pry off the panel. Work slowly to avoid breaking clips or scratching the interior. Some vehicles require removing multiple trim pieces, so consult your car’s manual for guidance.
Next, locate the screws or bolts securing the factory stereo. Use a screwdriver or socket wrench to remove them. Gently pull the stereo out to access the wiring behind it. Take a photo of the connections for reference—this helps when wiring the new unit. Disconnect the wiring harness and antenna cable. If the stereo resists, check for hidden screws or clips.
For older cars, you might need radio-removal keys, especially in Ford vehicles. Insert these tools into the slots on the stereo’s face, then pull it out. Store the old unit safely in case you need to reinstall it later.
Step 3: Prepare the Wiring Harness
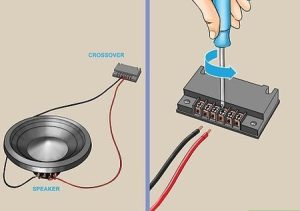
Wiring forms the backbone of your installation. A wiring harness adapter simplifies this step by matching your car’s wiring to the Android stereo. Compare the adapter’s wiring diagram with your vehicle’s harness. Most wires are color-coded, making it easy to pair them.
Connect the wires using a crimper for a secure, non-permanent fit, or solder them for a stronger bond. If soldering, strip the wire ends, twist them together, and apply heat with a soldering iron. Wrap each connection with electrical tape to prevent short circuits. Test the connections with a multimeter to ensure proper pairing.
If your stereo supports extras like a backup camera or steering wheel controls, connect those wires now. Follow the manufacturer’s instructions to avoid errors. A plug-and-play harness eliminates the need to cut factory wires, keeping the installation clean and reversible.
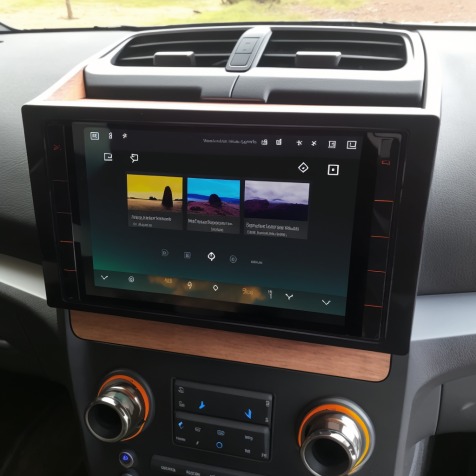
Step 4: Mount the Android Car Stereo
With the wiring ready, mount the new stereo. Attach the fitting kit’s brackets to the Android unit, ensuring a snug fit in the dashboard. Some vehicles need slight modifications, like trimming the dashboard or adjusting brackets. Use the screws or bolts from the fitting kit to secure the unit.
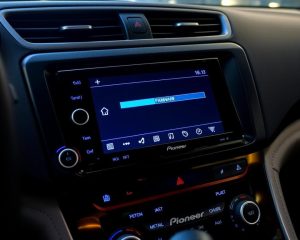
Slide the stereo into the dashboard slot, ensuring it aligns properly. Connect the wiring harness adapter to the stereo’s back, then plug in the antenna cable. If your unit includes a GPS antenna, Wi-Fi antenna, or microphone, route these cables neatly to their designated spots. For example, place the GPS antenna on the dashboard for optimal signal reception.
Step 5: Test the Stereo
Before finalizing the installation, test the system. Reconnect the car battery’s negative terminal and turn on the ignition. Power up the stereo to check if it boots correctly. Test key features:
- Audio: Play music through the speakers to confirm sound quality.
- Connectivity: Pair your smartphone via Bluetooth or Wi-Fi.
- Navigation: Launch a GPS app to verify signal strength.
- Extras: Test the backup camera, steering wheel controls, or other accessories.
Adjust the fade and balance settings to ensure all speakers work. If something fails, double-check the wiring against your reference photo. Loose connections or mismatched wires often cause issues. Fix any problems before moving forward.
Step 6: Secure and Reassemble
Once everything functions perfectly, secure the stereo. Push it fully into the dashboard until it clicks into place. Fasten any screws or bolts to hold it steady. Reattach the dashboard trim, snapping it back carefully to avoid damaging clips. If you removed knobs or other components, reinstall them now.
Perform a final inspection. Ensure no wires dangle loosely, as they could rattle or disconnect. Test the stereo again to confirm the trim doesn’t interfere with the touchscreen or buttons. A tidy installation enhances both aesthetics and functionality.
Tips for a Professional Installation
Achieving a polished result takes attention to detail. Keep these tips in mind:
- Label wires: Use tape to mark wires for easier identification.
- Route cables neatly: Zip ties prevent clutter behind the dashboard.
- Check compatibility: Verify the stereo fits your car before purchasing.
- Use quality tools: Invest in a good trim removal tool to avoid scratches.
- Consult professionals: If wiring feels overwhelming, seek expert help.
Patience pays off. Rushing risks mistakes, like damaged trim or faulty connections. Take breaks if needed to stay focused.
Common Challenges and Solutions
Even with careful planning, issues can arise. Here’s how to tackle common problems:
- Stereo doesn’t power on: Check the battery connection and wiring harness. Ensure the ground wire is secure.
- No sound: Verify speaker wire connections. Confirm the stereo’s audio settings enable all speakers.
- Poor GPS signal: Reposition the GPS antenna for a clearer line of sight.
- Trim won’t snap back: Inspect for misaligned clips or obstructing wires.
- Backup camera fails: Test the camera’s wiring and ensure it’s compatible with the stereo.
If problems persist, consult the stereo’s manual or online forums for model-specific advice. YouTube tutorials also offer visual guidance for tricky steps.
Benefits of a DIY Installation
Installing your Android car stereo yourself offers multiple rewards. You save on labor costs, which can exceed $100 for professional installation. You also gain a deeper understanding of your vehicle’s audio system, making future upgrades easier. The satisfaction of completing a hands-on project boosts confidence and adds a personal touch to your car.
This upgrade enhances your driving experience. Enjoy crystal-clear audio, seamless smartphone integration, and real-time navigation. Passengers benefit too, with access to entertainment options like streaming podcasts or videos during road trips. A modern stereo can even increase your car’s resale value, appealing to tech-savvy buyers.
Maintaining Your Android Car Stereo
To keep your new system in top shape, follow these maintenance tips:
- Update software: Check for firmware updates to improve performance and add features.
- Clean the screen: Use a microfiber cloth to remove fingerprints from the touchscreen.
- Inspect connections: Periodically check wires for wear or loosening.
- Protect from heat: Park in shaded areas to prevent overheating, which can affect electronics.
Regular care extends the stereo’s lifespan and ensures consistent performance.
Choosing the Right Android Car Stereo
Not all stereos suit every driver. Consider these factors when shopping:
- Screen size: Larger screens (e.g., 10.1 inches) offer better visibility but may require dashboard modifications.
- Processor and RAM: Units with 4GB RAM and octa-core processors handle apps smoothly.
- Compatibility: Ensure support for Android Auto, Apple CarPlay, or steering wheel controls.
- Budget: Prices range from $100 to $500. Balance features with affordability.
- Brand: Trusted names like Pioneer, Kenwood, and Atoto offer reliability and support.
Read reviews and compare specs to find a model that matches your needs. Websites like Crutchfield or Sonic Electronix provide compatibility checkers to simplify the process.
Enhancing Your Audio System
An Android stereo is just the start. Boost your setup with these upgrades:
- Speakers: Replace factory speakers with coaxial or component models for richer sound.
- Subwoofer: Add a subwoofer for deep bass, ideal for music enthusiasts.
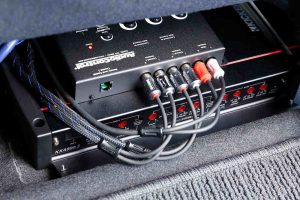
- Amplifier: Install an amp to power high-performance speakers without distortion.
- Sound deadening: Apply sound-deadening mats to reduce road noise and improve audio clarity.
Plan these upgrades during installation to minimize dashboard disassembly later.
Legal and Safety Considerations
Stay compliant with local laws. Some regions restrict touchscreen use while driving, so rely on voice commands or steering wheel controls. Ensure the stereo’s brightness doesn’t distract you at night—adjust settings for safe visibility. If installing a backup camera, position it to avoid obstructing your license plate, which could violate regulations.
Always prioritize safety. Keep your focus on the road, using hands-free features to minimize distractions. If the installation feels complex, don’t hesitate to consult a professional to avoid electrical mishaps.
Wrapping Up
Installing an Android car stereo upgrades your vehicle’s tech and entertainment. This step-by-step guide empowers you to tackle the project with confidence. From gathering tools to testing features, each phase builds toward a rewarding outcome. With careful planning and patience, you’ll enjoy a smart, connected driving experience tailored to your style.
Ready to hit the road with your new system? Share your installation journey or ask questions in the comments. For more car audio tips, explore our guides on speakers, subwoofers, and Bluetooth integration. Drive smart, stay safe, and enjoy the ride!