There’s a certain thrill that comes with upgrading your car stereo system. The promise of richer bass, clearer vocals, and an immersive audio experience is enough to make any car enthusiast excited. However, the key to unlocking the full potential of your upgraded stereo lies in the proper installation of the power system. In this guide, I’ll take you through the essential steps on how to run power wire from the battery to the amp, sharing my own experiences to ensure you get the best possible sound in your ride.
Understanding the Basics
Before diving into the nitty-gritty of installation, let’s take a moment to understand the basics of the process. The primary components involved in this upgrade are the car battery, the power wire, and the amplifier (amp). The significance of a clean and robust power supply cannot be overstated, as it directly influences the quality of audio output.
In my early days of experimenting with car audio upgrades, I learned the hard way about the impact of a suboptimal power connection. The audio quality was inconsistent, and I faced issues like unwanted noise and distortion. This experience drove me to delve deeper into the intricacies of power supply, leading me to discover the importance of a well-installed power system.
Gather Your Tools
To embark on this DIY journey, you’ll need a set of tools and materials to ensure a smooth installation process. Here’s a list to get you started:
- Power wire – Choose a high-quality, appropriately sized wire for your amplifier.
- Wire stripper and crimping tool – Essential for preparing and connecting wires.
- Screwdrivers and wrenches – For removing and securing components in your car.
- Zip ties and adhesive clips – To neatly secure the power wire along its route.
- Electrical tape – For insulating and protecting wire connections.
- Drill with bits – In case you need to create holes for routing the power wire.
- Safety gear – Gloves and safety glasses to protect yourself during the installation.
I’ve found that investing in quality tools and materials pays off in the long run, ensuring a reliable and durable power connection for your car audio system.
Safety First
Working with a car’s electrical system requires utmost care and attention to safety. Before starting the installation, follow these safety precautions:
- Disconnect the car battery – This is the first and most crucial step to prevent electrical shock.
- Use insulated tools – Ensure that the tools you’re using have insulated handles to minimize the risk of electrical contact.
- Work in a well-ventilated area – Adequate ventilation helps disperse any fumes that may arise during the installation.
- Avoid water exposure – Keep all components and tools dry to prevent short circuits.
I vividly remember the first time I attempted to upgrade my car audio system without taking proper safety measures. A minor shock served as a wake-up call, prompting me to prioritize safety in all future installations.
What Is the Best Power Wire for Car Audio?
Step-by-Step Guide: How to Run Power Wire from Battery to Amp
Now that you’ve gathered your tools and taken the necessary safety precautions, let’s delve into the step-by-step process of running power wire from the battery to the amp:
Disconnect the car battery:
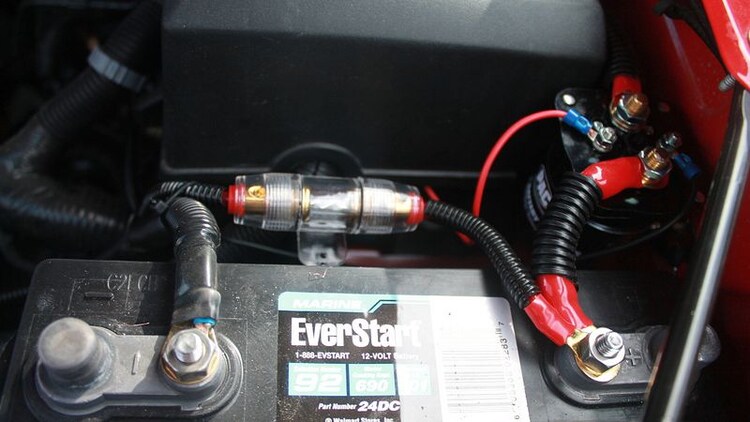
- Open the car hood and locate the battery.
- Use a pull to loosen the nut on the negative terminal.
- Once the negative terminal is disconnected, move on to the positive terminal.
Choose the route for the power wire:
- Plan the path the power wire will take from the battery to the amp, avoiding moving parts and hot areas.
- Consider existing wiring harnesses and use zip ties or adhesive clips to secure the power wire along its route.
Prepare the power wire:
- Use a wire stripper to remove a small section of insulation from the end of the power wire.
- If necessary, crimp a ring terminal onto the exposed wire end for a secure connection to the battery.
Route the power wire through the car interior:
- Carefully thread the power wire through the planned route, using existing openings or creating small holes if needed.
- Secure the wire using zip ties or adhesive clips, ensuring a clean and organized appearance.
Connect the power wire to the amp:
- Locate the power input on your amp and connect the power wire securely.
- Use a screwdriver to tighten the terminal, ensuring a snug fit.
- Insulate the connection using electrical tape.
Secure loose ends:
- Bundle any excess power wire neatly and secure it with zip ties.
- Double-check all connections to make sure they are tight and secure.
Through trial and error, I’ve refined this process to achieve optimal results in my car audio installations. Taking the time to plan the route, secure the wire properly, and ensure tight connections has consistently yielded excellent audio performance.
Troubleshooting and Common Mistakes
While the installation process is relatively straightforward, issues may still arise. Here are a number of common problems and how to address them:
Unwanted noise or distortion:
- Check all connections to ensure they are secure.
- Use shielded power wire to minimize interference.
Fuse blows repeatedly:
- Ensure the power wire is the correct gauge for your amp.
- Check for a short circuit by inspecting the entire length of the power wire.
Inconsistent power supply:
- Confirm that the battery is in decent condition.
- Upgrade to a higher capacity or performance battery if necessary.
- Check the amp’s impedance and ensure it matches your speaker setup.
- Verify that the power wire gauge is sufficient for the amp’s power requirements.
Through my own experiences, I’ve encountered and overcome these challenges, learning valuable lessons along the way. Troubleshooting is an inevitable part of any DIY project, and each obstacle presents an opportunity to enhance your skills.
Wrapping Up
In summary, running power wire from the battery to the amp is a critical aspect of upgrading your car stereo system. By following the steps outlined in this guide and incorporating safety measures, you can achieve a clean and reliable power connection that enhances your overall audio experience.
As you embark on this journey, don’t hesitate to share your experiences and ask questions. The car audio community is filled with enthusiasts who are more than willing to offer guidance and support. Remember, the joy of a well-tuned car audio system awaits you at the end of this installation – happy upgrading!


