Setting up a Skar amplifier transforms your car audio system into a powerhouse of sound. Skar Audio amplifiers deliver crisp, booming bass and crystal-clear highs, but only if you install and tune them correctly. This guide walks you through every step to set up your Skar amp like a pro, ensuring your car stereo system hits all the right notes. Whether you’re upgrading your subwoofer or enhancing your speakers, this article covers everything from wiring to tuning for the best audio experience.
Contents
- Why Choose a Skar Amplifier?
- Tools and Materials You’ll Need
- Step 1: Plan Your Installation
- Step 2: Disconnect the Car Battery
- Step 3: Run the Power Cable
- Step 4: Connect the Ground Cable
- Step 5: Install the Remote Wire
- Step 6: Connect RCA Cables
- Step 7: Wire the Speakers or Subwoofer
- Step 8: Reconnect the Battery and Test
- Step 9: Tune the Skar Amplifier
- Step 10: Secure and Organize the Setup
- Common Troubleshooting Tips
- Tips for Maintaining Your Skar Amplifier
- Conclusion
Why Choose a Skar Amplifier?
Skar Audio amplifiers stand out for their reliability, power, and affordability. They cater to car audio enthusiasts who crave deep bass and vibrant sound without breaking the bank. Before diving into the setup process, ensure you have the right tools and understand your amplifier’s specifications, such as wattage, impedance, and channel configuration. This knowledge helps you match the amp to your car’s audio components, like subwoofers or speakers, for seamless performance.
Tools and Materials You’ll Need
To set up your Skar amplifier, gather these essentials:
- Skar Audio amplifier
- Wiring kit (power cable, ground cable, RCA cables, remote wire)
- Screwdriver set
- Wire cutters and strippers
- Crimp tool
- Fuse holder and fuse
- Electrical tape
- Zip ties
- Multimeter (optional but helpful)
Having these tools ready streamlines the installation process and keeps your setup safe and tidy.
Step 1: Plan Your Installation
Start by choosing a suitable location for your Skar amplifier. The trunk or under a seat works well for most vehicles, as these spots provide enough space and ventilation. Avoid placing the amp in areas prone to moisture or extreme heat, as this can damage the unit. Measure the space to ensure the amplifier fits snugly without obstructing other components.
Next, map out your wiring path. The power cable runs from the car battery to the amplifier, while the ground cable connects to a metal surface in the vehicle. Keep the power and RCA cables on opposite sides of the car to prevent signal interference, which can cause unwanted noise in your audio system.
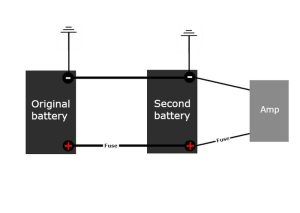
Step 2: Disconnect the Car Battery
Safety comes first. Disconnect the negative terminal of your car battery to avoid electrical shocks or short circuits during installation. Use a wrench to loosen the terminal and set it aside, ensuring no metal tools touch both battery terminals simultaneously. This step protects you and your vehicle’s electrical system.
Step 3: Run the Power Cable
The power cable supplies energy to your Skar amplifier, so install it carefully. Begin at the car battery’s positive terminal. Attach the fuse holder to the power cable within 12 inches of the battery to protect the system from power surges. Then, route the cable through the firewall (a protective barrier separating the engine and cabin) into the car’s interior.
Most vehicles have a pre-existing hole in the firewall, often covered by a rubber grommet. If not, drill a small hole and use a grommet to prevent the cable from fraying. Run the power cable along the car’s frame, securing it with zip ties to keep it neat and out of the way. Avoid sharp edges or moving parts that could damage the cable.
Step 4: Connect the Ground Cable
A solid ground connection ensures your Skar amp operates efficiently. Find a clean, unpainted metal surface near the amplifier, such as a bolt in the trunk or chassis. Scrape away any paint or rust to expose bare metal, as this improves conductivity. Attach the ground cable to this point using a ring terminal and secure it tightly with a bolt.
Keep the ground cable short—ideally under 18 inches—to minimize resistance. A poor ground connection can cause your amplifier to malfunction or produce distorted sound, so double-check this step.
Step 5: Install the Remote Wire
The remote wire tells your Skar amplifier when to turn on, syncing it with your car’s head unit (stereo). Connect one end of the remote wire to the remote output on the back of your head unit, usually a blue or blue-and-white wire. Run the wire alongside the power cable to the amplifier’s remote input terminal.
If your head unit lacks a remote output, connect the remote wire to a switched power source, like the ignition or an accessory fuse. This setup ensures the amp powers on only when the car is running, preventing battery drain.
Step 6: Connect RCA Cables
RCA cables carry the audio signal from your head unit to the Skar amplifier. Plug the RCA cables into the pre-out jacks on your head unit, matching the left and right channels. Then, route the cables to the amplifier’s RCA input jacks, keeping them away from the power cable to avoid interference.
If your head unit doesn’t have RCA outputs, use a line output converter to adapt speaker wires to RCA signals. This device ensures compatibility between your stereo and the amplifier.
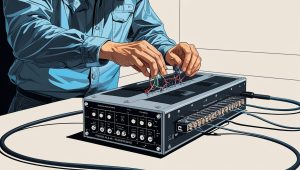
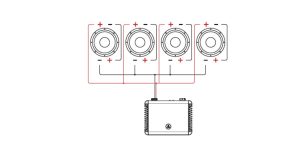
Step 7: Wire the Speakers or Subwoofer
Now, connect your speakers or subwoofer to the Skar amplifier. Check the amp’s manual to confirm the correct terminals for your setup, as Skar amps support various configurations, like mono for subwoofers or stereo for speakers. Use high-quality speaker wire to maintain signal integrity.
Match the impedance (measured in ohms) of your speakers or subwoofer to the amplifier’s rating. For example, if your Skar amp is rated for 2 ohms, ensure your subwoofer’s impedance matches to avoid overheating or reduced performance. Secure the wires to the amp’s speaker terminals, ensuring no loose strands cause a short circuit.
Step 8: Reconnect the Battery and Test
With all connections in place, reconnect the car battery’s negative terminal. Turn on your car and head unit to test the system. Listen for clear sound from your speakers or subwoofer. If you hear distortion, static, or no sound, check your connections for loose wires or incorrect settings.
Use a multimeter to verify the power and ground connections deliver the correct voltage. A reading of 12-14 volts at the amplifier’s power terminal indicates a healthy setup.
Step 9: Tune the Skar Amplifier
Tuning your Skar amplifier optimizes sound quality and protects your audio components. Skar amps feature several controls, including:
- Gain: Adjusts the input signal strength. Set it to match your head unit’s output voltage, typically between 2-4 volts. Avoid maxing out the gain, as this causes clipping and distortion.
- Low-Pass Filter (LPF): For subwoofers, set the LPF to block high frequencies, focusing on bass. A range of 80-120 Hz works well for most setups.
- High-Pass Filter (HPF): For speakers, set the HPF to block low frequencies, ensuring clear mids and highs. Try 80-150 Hz as a starting point.
- Bass Boost: Enhances low-end frequencies. Use sparingly to avoid overpowering your subwoofer or causing distortion.
- Subsonic Filter: Blocks ultra-low frequencies that subwoofers can’t reproduce, protecting them from damage. Set it around 20-30 Hz.
Play a variety of music tracks to fine-tune these settings. Adjust the controls gradually, listening for balance and clarity. If your Skar amp includes a remote bass knob, use it to adjust bass levels on the fly without touching the amp.
Step 10: Secure and Organize the Setup
Once you’re satisfied with the sound, secure the amplifier to its mounting location using the provided brackets or screws. Ensure it’s stable and won’t shift while driving. Organize the wiring with zip ties and electrical tape to prevent loose cables from rattling or disconnecting.
Double-check that all connections are tight and insulated to avoid electrical issues. A clean, organized setup not only looks professional but also reduces the risk of malfunctions.
Common Troubleshooting Tips
If your Skar amplifier isn’t performing as expected, try these fixes:
- No sound: Check the power, ground, and remote wire connections. Ensure the head unit is on and sending a signal.
- Distorted sound: Lower the gain or bass boost. Verify that the speaker impedance matches the amp’s rating.
- Amp overheating: Ensure proper ventilation and check for a mismatched impedance load. Reduce the gain if it’s set too high.
- Noise or static: Reroute RCA cables away from power cables. Confirm the ground connection is secure and corrosion-free.
If issues persist, consult your Skar amplifier’s manual or contact Skar Audio’s customer support for assistance.
Tips for Maintaining Your Skar Amplifier
To keep your Skar amp in top shape, follow these practices:
- Regularly inspect wiring for wear or loose connections.
- Clean the amplifier with a dry cloth to remove dust.
- Avoid overloading the amp with mismatched speakers or excessive gain.
- Ensure proper ventilation to prevent overheating during long drives.
A well-maintained amplifier delivers consistent performance and extends the life of your car audio system.
Conclusion
Setting up a Skar amplifier elevates your car audio to new heights, delivering powerful bass and crisp sound. By following these steps—planning the installation, wiring carefully, and tuning the amp—you create a system that rivals professional setups. Take your time, double-check connections, and fine-tune the settings to match your musical preferences. With a properly installed Skar amp, every drive becomes a concert on wheels.
Ready to crank up the volume? Grab your tools, follow this guide, and enjoy the ultimate car audio experience with your Skar amplifier!