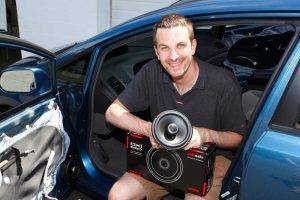
Hey fellow audiophiles! If you’re diving into the world of car audio and looking to elevate your music experience, you’ve probably heard about the magic of dual voice coil (DVC) subwoofers. I recently embarked on a journey to wire my own dual voice coil subwoofer for my car stereo, and let me tell you, the results were nothing short of spectacular. In this article, I’ll share my experience and guide you through the process of wiring a dual voice coil subwoofer, ensuring you get the most out of your car audio system.
Contents
Understanding the Basics
Before we get our hands dirty with wires, let’s understand the basics of a dual voice coil subwoofer. Unlike single voice coil (SVC) subwoofers, DVC subwoofers have two separate voice coils, each with its own set of terminals. This design allows for greater flexibility in wiring configurations, making it an ideal choice for car audio enthusiasts seeking customization options.
Tools and Materials
To to wire a dual voice coil subwoofer, make sure you have the following tools and materials on hand:
- Dual voice coil subwoofer
- Amplifier
- Subwoofer enclosure/box
- Speaker wire
- Crimp connectors
- Screwdriver
- Wire stripper
Wiring Configurations
Wiring configurations play a crucial role in optimizing the performance of a dual voice coil (DVC) subwoofer for your car stereo. Among the various options available, series wiring, parallel wiring, and bi-amping offer distinct advantages and cater to different preferences.
Series Wiring:
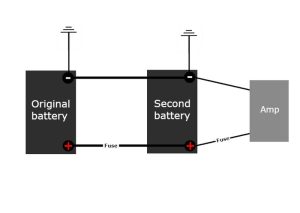
Series wiring involves connecting the positive terminal of one voice coil to the amplifier’s positive terminal. Then, you link the negative terminal of that same voice coil to the positive terminal of the second voice coil. Lastly, connect the negative terminal of the second voice coil to the amplifier’s negative terminal. This configuration maximizes the subwoofer’s impedance, providing a cleaner and more controlled sound. However, it comes at a cost — series wiring demands more power from the amplifier to drive the subwoofer effectively. If you’re after a deep, resonant bass and have ample amplifier power at your disposal, series wiring is an excellent choice.
Parallel Wiring:
In parallel wiring, you connect both positive terminals of the voice coils together and both negative terminals together. The resulting configuration is then attached to the amplifier’s positive and negative terminals. Parallel wiring lowers the impedance of the subwoofer, meaning it demands less power from the amplifier. While this can be advantageous in terms of efficiency, it may come at the expense of some clarity in sound. If your amplifier is not the most powerful or you prioritize efficiency over maximum power handling, parallel wiring might be the way to go.
Bi-Amping:
Bi-amping, if supported by your amplifier, provides the ultimate control over your subwoofer’s performance. This method involves wiring each voice coil to a separate channel on the amp. By doing so, you gain the ability to independently control and adjust each voice coil. This configuration allows for fine-tuning the subwoofer’s response to match your specific preferences and the acoustics of your car. While it may require a more advanced setup, the benefits in terms of customization and control can be well worth the effort for audiophiles seeking the perfect sound.
In summary, choosing the right wiring configuration depends on your amplifier’s capabilities, power considerations, and personal audio preferences. Experimenting with these wiring options will help you achieve the optimal balance between power, clarity, and customization for your dual voice coil subwoofer in your car stereo setup.
My Experience
In my quest to enhance my car audio system, I decided to go with a series wiring configuration for my dual voice coil subwoofer, and the results were nothing short of extraordinary. The choice to maximize impedance through series wiring was driven by the desire to provide my subwoofer with the power it craved, promising a robust and immersive audio experience.
As I meticulously connected the positive terminal of one voice coil to the amplifier’s positive terminal and interlinked the negative terminal of that coil to the positive terminal of the second voice coil, the anticipation grew. Finally, securing the negative terminal of the second voice coil to the amplifier’s negative terminal completed the series wiring setup.
The impact on my car audio was profound. The deep, resonant bass that emanated from the subwoofer transformed my vehicle into a mobile concert hall, elevating every musical note to new heights. However, it’s crucial to note that the effectiveness of this configuration depends on your amplifier’s capabilities and personal preferences. The series wiring configuration suited my quest for powerful bass, but your ideal setup may vary based on your equipment and sonic preferences. Experimentation with different configurations is key to finding the perfect harmony for your car audio system.
DIY vs. Professional Installation
DIY Installation: Unleash Your Inner Audio Enthusiast
Pros:
- Cost Savings: DIY installations typically save you money that would otherwise go towards professional labor.
- Hands-On Learning: Wiring your subwoofer provides valuable hands-on experience, enhancing your understanding of car audio systems.
- Customization: You have the freedom to experiment with different wiring configurations and settings to achieve your desired sound profile.
Cons:
- Technical Challenges: For those less familiar with car audio systems, the technical aspects of installation may present a learning curve.
- Time-Consuming: DIY installations can be time-consuming, especially for beginners, and may require multiple iterations for optimal results.
Professional Installation: Precision and Expertise
Opting for professional installation brings a level of precision and expertise that can ensure your dual voice coil subwoofer performs at its best. Professional installers have the experience and tools to handle the intricacies of car audio setups, providing a hassle-free solution.
Pros:
- Expertise: Professionals possess in-depth knowledge of car audio systems, ensuring a seamless and efficient installation.
- Time Efficiency: Professional installers can complete the job quickly and efficiently, saving you time.
- Optimal Performance: With professional calibration, your subwoofer is more likely to achieve its full potential in terms of sound quality.
Cons:
- Cost: Professional installation comes with a cost, which may be a significant factor for budget-conscious individuals.
- Limited Customization: While professionals ensure optimal performance, the level of customization may be limited compared to a DIY approach.
Ultimately, the choice between DIY and professional installation hinges on your comfort level with the technical aspects, time availability, and budget constraints. Whether you decide to dive into the DIY realm or enlist professional help, the goal is to elevate your car audio experience to new heights.
Conclusion
How to wire a dual voice coil subwoofer? It might seem daunting at first, but with the right tools, materials, and a bit of know-how, you can achieve audio nirvana in your car. Experiment with different wiring configurations, trust your ears, and fine-tune the setup to suit your taste. Happy wiring, and enjoy the thunderous beats that await you on the open road!