Wiring a car stereo to a 12V battery opens up a world of possibilities for music lovers and DIY enthusiasts. Whether you’re setting up a sound system for a road trip, a tailgate party, or a custom audio project, this guide walks you through the process with clarity and precision. By following these steps, you’ll connect your car stereo safely and efficiently, ensuring crisp sound and reliable performance. This comprehensive tutorial, now expanded to over 2,000 words, covers tools, materials, safety tips, troubleshooting, and advanced techniques to help you master the task.
Contents
- Why Wire a Car Stereo to a 12V Battery?
- Tools and Materials You’ll Need
- Safety First: Protecting Yourself and Your Equipment
- Step-by-Step Guide to Wiring Your Car Stereo to a 12V Battery
- Troubleshooting Common Issues
- Advanced Tips for Optimizing Your Setup
- Choosing the Right Battery for Your Stereo
- Maintaining Your Car Stereo and Battery
- Legal and Practical Considerations
- Conclusion
Why Wire a Car Stereo to a 12V Battery?
Connecting a car stereo to a 12V battery allows you to enjoy high-quality audio outside a vehicle. For instance, you can create a portable sound system for camping, use it in a garage setup, or test a stereo before installing it in a car. A 12V battery, commonly found in cars, motorcycles, or marine applications, provides the power needed to run the stereo without a vehicle’s electrical system. This setup offers flexibility and convenience, especially for off-grid or temporary installations.
Before diving into the process, let’s explore the benefits of this project:
- Portability: Take your music anywhere with a standalone power source.
- Cost-Effective: Use an existing car stereo and battery to save money.
- Customization: Tailor your audio setup for specific events or environments.
- Learning Opportunity: Gain hands-on experience with automotive electronics.
Now, let’s get started with the essentials.
Tools and Materials You’ll Need
To wire a car stereo to a 12V battery, gather the following items. Having everything ready streamlines the process and prevents interruptions.
Tools
- Wire cutters/strippers: For trimming and preparing wires.
- Crimping tool: To secure connectors to wires.
- Screwdriver set: For mounting the stereo or removing panels.
- Multimeter: To test voltage and ensure proper connections.
- Electrical tape or heat shrink tubing: For insulating exposed wires.
- Soldering iron (optional): For stronger, permanent connections.
- Pliers: For twisting wires or securing connectors.
Materials
- Car stereo: Ensure it’s compatible with a 12V power source.
- 12V battery: A car, motorcycle, or sealed lead-acid battery works well.
- Battery terminals or clamps: To connect wires to the battery.
- Speaker wire (16-18 gauge): For connecting speakers to the stereo.
- Power wire (12-14 gauge): For linking the stereo to the battery.
- Ground wire (12-14 gauge): To complete the circuit.
- Inline fuse holder with fuse (10-15 amps): To protect the system from short circuits.
- Butt connectors or spade connectors: For joining wires securely.
- Speakers: Choose ones compatible with your stereo’s power output.
- Wire loom (optional): To organize and protect wires.
With your tools and materials ready, let’s move on to safety precautions.
Safety First: Protecting Yourself and Your Equipment
Working with electrical systems, even low-voltage ones like a 12V battery, requires caution. Follow these safety tips to avoid injury or damage:
- Disconnect the Battery: Always remove the negative terminal first to prevent accidental shorts.
- Wear Protective Gear: Use insulated gloves and safety glasses to shield against sparks or debris.
- Work in a Ventilated Area: Batteries can release gases, so avoid enclosed spaces.
- Check Wire Ratings: Use wires rated for the current your stereo draws to prevent overheating.
- Double-Check Connections: Loose or incorrect wiring can damage the stereo or battery.
- Keep Tools Insulated: Use tools with rubber grips to reduce the risk of shocks.
By prioritizing safety, you set the stage for a smooth and successful project. Next, let’s dive into the wiring process.
Step-by-Step Guide to Wiring Your Car Stereo to a 12V Battery
This section breaks down the process into clear, manageable steps. Follow along carefully to ensure a proper connection.
Step 1: Prepare the Car Stereo and Battery
Before connecting anything, inspect your car stereo and battery. Confirm the stereo’s voltage rating (typically 12V) matches the battery. Check the battery’s charge with a multimeter; it should read around 12.6V when fully charged. If the battery is low, charge it using a compatible charger.
Place the stereo and battery on a stable, non-conductive surface, like a wooden table. Ensure the battery’s terminals are clean and free of corrosion. If you spot rust, clean it with a wire brush or a baking soda-water solution.
Step 2: Identify the Stereo’s Wiring Harness
Most car stereos come with a wiring harness, a bundle of color-coded wires that connect to power, ground, speakers, and accessories. Refer to the stereo’s manual to identify each wire’s function. Common wire colors include:
- Red: Accessory power (turns the stereo on/off).
- Yellow: Constant power (maintains memory settings).
- Black: Ground (completes the circuit).
- Blue: Remote/antenna (activates amplifiers or antennas).
- White/Grey/Green/Purple: Speaker wires (with positive/negative markings).
If your stereo lacks a harness, consult the manual for terminal labels or use a multimeter to identify connections.
Step 3: Connect the Power Wires
The power wires link the stereo to the battery’s positive terminal. Here’s how to do it:
- Cut a Length of Power Wire: Measure the distance from the stereo to the battery, adding a few inches for slack. Use 12-14 gauge wire.
- Install the Inline Fuse: Attach the fuse holder to the power wire, about 6-12 inches from the battery end. This protects the system from short circuits. Insert a 10-15 amp fuse, depending on the stereo’s power requirements.
- Connect to the Battery: Strip 1/4 inch of insulation from the power wire’s end. Crimp a battery terminal or clamp to the wire, then attach it to the battery’s positive (+) terminal.
- Connect to the Stereo: Strip the other end of the power wire. If the stereo has a harness, crimp the wire to the yellow (constant power) and red (accessory power) wires using butt connectors. If there’s no harness, connect to the stereo’s positive terminals as indicated in the manual.
Step 4: Connect the Ground Wire
The ground wire completes the circuit by connecting to the battery’s negative terminal:
- Cut a Ground Wire: Use 12-14 gauge wire, measuring the distance from the stereo to the battery.
- Connect to the Battery: Strip one end, crimp a terminal, and attach it to the battery’s negative (-) terminal.
- Connect to the Stereo: Strip the other end and connect it to the stereo’s black ground wire or ground terminal. Use a butt connector for harness connections or a spade connector for terminal connections.
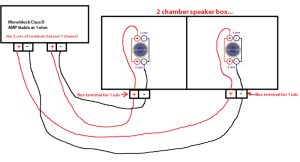
Step 5: Wire the Speakers
Speakers bring your stereo to life. Follow these steps to connect them:
- Choose Speaker Placement: Position speakers for optimal sound, ensuring they’re secure and protected from moisture.
- Cut Speaker Wire: Measure the distance from the stereo to each speaker, using 16-18 gauge wire.
- Connect to Speakers: Strip the wire ends and connect to the speaker terminals, matching positive (+) and negative (-) markings. Most speakers have labeled terminals or color-coded wires.
- Connect to Stereo: Route the wires to the stereo. Match each speaker wire to the corresponding harness wires (e.g., white for front left, grey for front right). Use butt connectors to secure the connections.
Step 6: Insulate and Organize Wires
Exposed wires can cause shorts or damage. Wrap all connections with electrical tape or heat shrink tubing. For a cleaner setup, bundle wires with a wire loom or zip ties. This step enhances safety and keeps your project tidy.
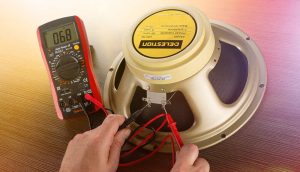
Step 7: Test the System
Before finalizing, test the setup:
- Reconnect the Battery: Attach the negative terminal first, then the positive.
- Turn On the Stereo: Power it on and check for sound from all speakers.
- Use a Multimeter: Verify the voltage at the stereo’s power input (should be ~12V).
- Check Functionality: Test volume, balance, and input sources (e.g., radio, Bluetooth, AUX).
If the stereo doesn’t work, troubleshoot using the tips below.
Step 8: Secure the Setup
Once everything works, secure the stereo, battery, and speakers in their final positions. Use brackets, mounts, or adhesive strips to prevent movement. If the setup is portable, consider a carrying case or enclosure to protect the components.
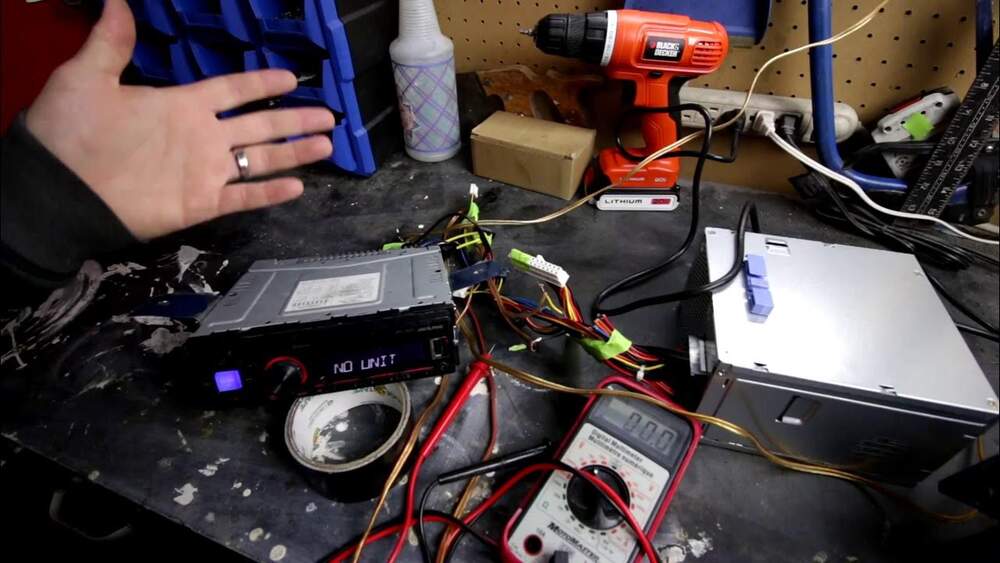
Troubleshooting Common Issues
Even with careful wiring, issues can arise. Here are solutions to common problems:
- No Power: Check the fuse, battery charge, and connections. Ensure the red and yellow wires are properly connected.
- No Sound: Verify speaker connections and ensure wires match positive/negative terminals. Test speakers individually.
- Static or Distortion: Inspect for loose connections or damaged wires. Move wires away from interference sources like power cables.
- Battery Drains Quickly: Confirm the stereo’s power draw matches the battery’s capacity. Use a higher-capacity battery for longer use.
- Overheating: Ensure wires are rated for the current and connections are secure. Add a cooling fan for high-power setups.
If problems persist, consult the stereo’s manual or seek advice from an automotive audio professional.
Advanced Tips for Optimizing Your Setup
For enthusiasts looking to elevate their project, consider these advanced techniques:
- Add an Amplifier: Boost sound quality by connecting an amplifier between the stereo and speakers. Use the blue remote wire to activate the amp.
- Incorporate a Switch: Install a toggle switch on the red accessory wire for easy on/off control.
- Use a Deep-Cycle Battery: For extended use, opt for a deep-cycle battery designed for repeated discharges.
- Add Bluetooth or USB: Upgrade to a stereo with Bluetooth or USB inputs for modern connectivity.
- Soundproof the Enclosure: If using a box or enclosure, add foam or damping material to reduce vibrations and enhance sound clarity.
These enhancements take your setup to the next level, delivering professional-grade audio.
Choosing the Right Battery for Your Stereo
Selecting the right 12V battery ensures reliable performance. Here are popular options:
- Car Battery: High capacity but heavy; ideal for stationary setups.
- Motorcycle Battery: Compact and lightweight; great for portable systems.
- Sealed Lead-Acid Battery: Maintenance-free and safe for indoor use.
- Lithium-Ion Battery: Lightweight and long-lasting but more expensive.
Calculate the stereo’s power consumption (in watts) and divide by 12V to estimate current draw. Choose a battery with an amp-hour (Ah) rating that supports your desired runtime. For example, a 10Ah battery powers a 2A stereo for about 5 hours.
Maintaining Your Car Stereo and Battery
Regular maintenance extends the life of your setup:
- Check Connections: Inspect wires and terminals monthly for corrosion or looseness.
- Charge the Battery: Recharge after each use to prevent deep discharge.
- Clean Components: Wipe down the stereo and speakers to remove dust.
- Store Properly: Keep the battery in a cool, dry place when not in use.
With proper care, your system will deliver years of reliable performance.
Legal and Practical Considerations
Before using your setup in public, consider these factors:
- Noise Regulations: Check local laws to avoid disturbing others.
- Battery Safety: Transport batteries securely to prevent spills or damage.
- Power Limits: Ensure your stereo’s power output complies with event or venue rules.
By staying mindful of these considerations, you’ll enjoy your setup without issues.
Conclusion
Wiring a car stereo to a 12V battery is a rewarding project that combines technical skill with creative freedom. By following this guide, you’ve learned how to gather tools, connect wires, troubleshoot issues, and optimize your setup for peak performance. Whether you’re blasting tunes at a barbecue or testing a stereo in your garage, this setup delivers powerful sound wherever you go.
Take your time, prioritize safety, and don’t hesitate to experiment with advanced features like amplifiers or Bluetooth. With practice, you’ll master automotive audio and create a system that’s uniquely yours. Ready to get started? Grab your tools and turn up the volume!