Embarking on the journey of wiring your car stereo to a 12V battery is an exciting endeavor for any car audio enthusiast. As a fellow music lover who has navigated the intricate process, I’m thrilled to guide you through the ins and outs of this transformation. In this detailed guide, we will not only explore the step-by-step procedure of how to wire a car stereo to a 12v battery but also delve into the art of mastering EQ settings for an unparalleled audio experience.
Understanding the Basics
Before we dive into the technicalities, let’s establish a solid foundation by understanding the key components involved in this process:
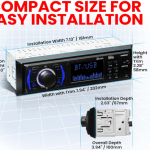
- Car Stereo Unit: The heart of your car’s audio system. Choose a stereo that suits your preferences, fits your vehicle, and comes equipped with features such as Bluetooth connectivity, USB ports, and compatibility with various audio file formats.
- Wiring Harness: This intermediary component plays a pivotal role in simplifying the installation process. It connects your car’s existing wiring to the new stereo, ensuring compatibility and ease of connection.
- 12V Battery: The powerhouse of your vehicle’s electrical system. Ensure your car’s battery is in good condition to support the additional load from the new stereo.
- Tools: Gather the necessary tools, including wire strippers, crimp connectors, a soldering iron, and panel removal tools. Having the right tools will make the installation clean, secure, and hassle-free.
Wiring Your Car Stereo
Let’s embark on the step-by-step journey of wiring your car stereo to a 12V battery:
- Disconnect the Battery: Begin by prioritizing safety. Disconnect the negative terminal of your car battery to ensure a safe installation process.
- Remove the Existing Stereo: Carefully remove the existing stereo unit using the appropriate tools. Refer to your vehicle’s manual for specific instructions on panel removal.
- Connect the Wiring Harness: The wiring harness acts as a bridge between your car’s existing wiring and the new stereo. Connect the wiring harness, matching the color-coded wires from the harness to those on the stereo unit.
- Connect to the 12V Battery: Identify the positive and negative wires on your stereo’s wiring harness. Connect the positive wire to the positive terminal of the car battery and the negative wire to the negative terminal.
- Secure Wiring: Once the connections are made, bundle and secure the wires neatly to prevent interference and ensure a tidy installation. Zip ties or electrical tape can be used for a clean finish.
Mastering EQ Settings for an Enhanced Audio Experience
Now that your car stereo is successfully wired to the 12V battery, let’s shift our focus to the art of equalization (EQ). Mastering EQ settings allows you to fine-tune the audio output, creating a customized and optimal listening experience within the confines of your vehicle.
- Understand EQ Bands: Most car stereos come equipped with a basic 3-band EQ, which includes controls for bass, midrange, and treble. Understanding how these bands affect audio frequencies is crucial for achieving the desired sound profile.
- Start with Flat Settings: Begin the EQ calibration process by setting all bands to flat or neutral. This provides a baseline for making adjustments and ensures a balanced starting point.
- Adjust Bass: If you’re a fan of deep, thumping bass, gradually increase the bass level until it complements the overall audio without overpowering it. Be cautious not to push the bass to a level that distorts the sound.
- Fine-Tune Midrange: The midrange frequencies cover vocals and instruments. Adjust this band to enhance the clarity of vocals and the warmth of instruments. This step is crucial for achieving a well-rounded and immersive sound.
- Refine Treble: Treble controls the high-frequency sounds. Adjust the treble to your liking, ensuring it’s not too sharp, causing discomfort, or too dull, leading to a lack of sparkle in the audio.
- Test and Iterate: Take your car for a spin and listen to various genres of music. Tweak the EQ settings as needed to achieve the perfect balance for different types of audio. This iterative process allows you to fine-tune the settings to your specific preferences.
Conclusion
Congratulations! You’ve successfully navigated the intricate process of how to wire a car stereo to a 12v battery and embarked on the journey of mastering EQ settings. As you revel in the transformed audio experience, remember that personal preferences play a significant role in shaping your ideal sound profile.
By investing time and effort into the installation and calibration process, you’ve transformed your car into a mobile concert hall, where every note and beat resonates with clarity and precision. Now, hit the road, enjoy the symphony of your upgraded car audio system, and let the music accompany you on every journey.