Upgrading your car stereo system can significantly enhance your driving experience, and one essential aspect of this upgrade is wiring your door speakers to an amplifier. This process might seem daunting to beginners, but fear not; in this guide, we’ll break down the steps to wire door speakers to an amp, ensuring you get the finest sound quality possible for your car audio system.
Understanding the Basics of Car Audio Wiring
When it comes to upgrading your car audio system, wiring plays a pivotal role in determining the quality of sound you’ll experience. Let’s delve deeper into the key aspects:
- The Role of Amplifiers in Car Audio Systems: Amplifiers are like the heart of your car’s audio system. They take the weak electrical signals from your car stereo head unit and boost them to provide the power needed to drive your speakers. This amplification is crucial for achieving high-quality sound, especially when it comes to aftermarket speakers.
- Types of Amplifiers: 2-Channel vs. 4-Channel: Understanding the type of amplifier you need is essential. A 2-channel amplifier is suitable for powering a pair of speakers, typically used for front or rear door speakers. On the other hand, a 4-channel amplifier can power both front and rear speakers, providing a more comprehensive audio upgrade.
- Why Wire Door Speakers to an Amplifier? Your car’s factory head unit may not provide sufficient power to make the most of your new speakers. Wiring your door speakers to an amplifier ensures they receive ample power, resulting in improved clarity, volume, and overall audio quality.
By investing in a good amplifier and properly wiring your door speakers to it, you can unlock the full potential of your car audio system, turning your vehicle into a mobile concert hall. Now, let’s move on to the practical steps of wiring your door speakers to an amplifier.
Gathering the Necessary Tools and Materials
Before you dive into the process of wiring your door speakers to an amplifier, it’s crucial to ensure you have all the required tools and materials at your disposal. Here’s a list to help you get started:
Tools:
- Screwdrivers: Phillips and flathead screwdrivers for removing panels and securing connections.
- Wire stripper and crimper: Essential for preparing and securing wires.
- Wire cutters: For cutting and sizing wires accurately.
- Soldering iron and solder: If you prefer soldered connections for added security.
- Multimeter: Helps verify correct connections and polarity.
- Crimp connectors and heat shrink tubing: For a secure and insulated wire connection.
- Panel removal tools: To safely remove door panels without causing damage.
Materials:
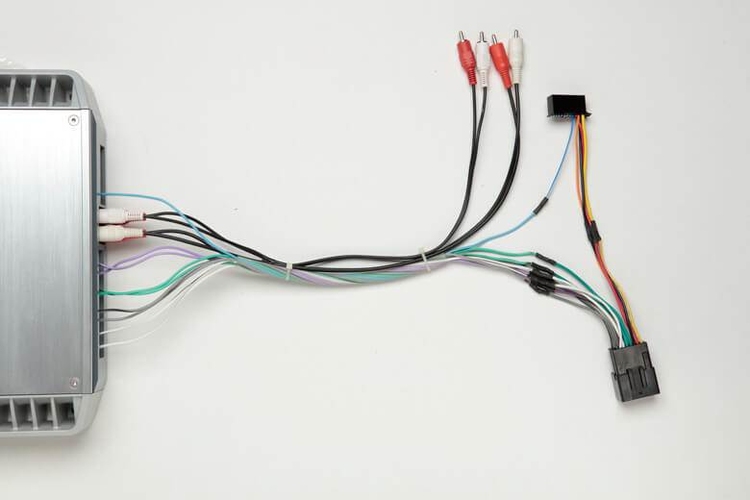
- Amplifier wiring kit: Includes power and ground cables, remote turn-on wire, and RCA cables.
- Speaker wires: High-quality speaker wires of appropriate length.
- Amplifier and speaker mounting hardware: Screws, brackets, and other accessories for installation.
- Electrical tape and zip ties: For managing and securing wires neatly.
Having these tools and materials on hand will ensure a smoother and more efficient installation process, minimizing the chances of delays or complications. Safety gear, such as gloves and safety glasses, is also recommended to protect yourself during the installation.
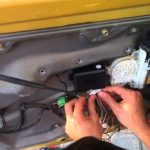
Removing the Door Panels
Before you can access your door speakers for wiring, you’ll need to remove the door panels. This step is crucial but requires care to avoid damaging your vehicle’s interior. Follow these steps:
- Disconnect the Battery: For safety, disconnect the car battery’s negative terminal to prevent electrical accidents during the process.
- Locate and Remove Screws and Fasteners: Look for screws or fasteners holding the door panel in place. Common locations include inside the door handle, armrest, and around the edges of the panel. Remove them carefully.
- Use a Panel Removal Tool: Gently insert a panel removal tool between the door panel and the door frame. Pry the panel away, starting at the bottom and working your way up. Take care not to force it or damage the clips that secure the panel.
- Disconnect Electrical Connections: Once the panel is loose, you’ll find electrical connections for window switches, door locks, and speakers. Carefully disconnect these connectors.
- Lift and Remove the Panel: Lift the panel upwards to release it from the top edge of the door frame. Set it aside in a safe place.
With the door panel removed, you’ll have access to the speakers and the wiring inside the door.
Identifying Speaker Wires and Connections
Now that you have access to the speakers, you need to identify the speaker wires and understand their connections. Here’s how:
- Locate the Speaker Wires: Look for a pair of wires connected to each speaker. These wires are typically color-coded, with one wire being positive (+) and the other negative (-).
- Determine Polarity: Polarity is crucial for proper sound reproduction. Recognize which wire is positive and which is negative. You can often find markings like “+” or color-coding (e.g., red for positive, black for negative).
Understanding the speaker wires and their polarity is essential for correctly wiring your door speakers to the amplifier. Make sure to note this information for each speaker before proceeding.
Choosing the Right Wiring Configuration
Choosing the right wiring configuration for your door speakers and amplifier is vital to ensure optimal sound quality and performance. Two common configurations are parallel and series wiring:
- Parallel Wiring: In this configuration, the positive (+) terminals of the speakers are connected together, and the negative (-) terminals are connected together. This results in a lower overall impedance and increased power to the speakers. It’s a suitable choice if your amplifier can handle the lowered impedance.
- Series Wiring: In series wiring, the positive (+) terminal of one speaker is connected to the negative (-) terminal of the other speaker. The remaining positive and negative terminals are then connected to the amplifier. This configuration increases the overall impedance and is ideal if your amplifier prefers higher-impedance loads.
To determine the best wiring configuration, check your amplifier’s specifications and consult the speaker manufacturer’s guidelines. Calculating the total impedance of your speakers in the chosen configuration is essential to ensure compatibility with your amplifier.
Connecting the Speakers to the Amplifier
Now that you’ve determined the wiring configuration, it’s time to connect your door speakers to the amplifier. Follow these steps:
- Prepare the Speaker Wires: Cut the speaker wires to the appropriate lengths, leaving a bit of extra length for flexibility. Band the ends of the wires to expose the bare metal.
- Connect the Wires: If you’re using parallel wiring, connect the positive (+) wires from both speakers to the positive (+) output on the amplifier. Likewise, connect the negative (-) wires to the negative (-) output. If you’re using series wiring, follow the same pattern but with one speaker’s positive (+) wire connected to the amplifier’s positive output and the other speaker’s negative (-) wire to the amplifier’s negative output.
- Secure the Connections: Use crimp connectors or solder the connections for a secure and reliable electrical connection. Ensure there are no loose wires that could cause shorts or signal loss.
- Insulate the Connections: Apply heat shrink tubing or electrical tape to insulate and protect the connections from moisture and damage.
Setting Up the Amplifier
With your speakers wired to the amplifier, it’s time to set up the amplifier itself:
- Proper Amplifier Placement: Mount the amplifier in a secure location in your vehicle, preferably away from moisture and excessive heat. Ensure it’s securely fastened to prevent vibrations and potential damage.
- Adjust Gain, Crossover, and Other Settings: Refer to your amplifier’s manual to fine-tune settings such as gain (volume control), crossover frequencies, and equalization. These adjustments help optimize sound quality and prevent distortion.
By correctly setting up your amplifier, you ensure that your door speakers receive the right amount of power and that the sound output is tailored to your preferences.
Testing Your System
Before reassembling the door panels and finalizing your installation, it’s essential to test your system:
- Check for Sound: Turn on your car stereo and play some music. Listen carefully for any issues, such as distortion, imbalance, or no sound at all.
- Verify Speaker Polarity: Ensure that each speaker is correctly wired with the proper polarity to avoid phase issues.
- Adjust Settings: Fine-tune your amplifier and stereo settings as needed to achieve the desired sound quality.
If everything sounds good and there are no issues, you’re ready to move on to the next steps.
Reassembling the Door Panels
Now that you’ve successfully wired your door speakers to the amplifier and tested your system, it’s time to reassemble the door panels:
- Reconnect Electrical Connections: Reconnect any electrical connections, such as window switches and door locks, to the door panel.
- Align and Secure the Panel: Carefully align the door panel with the door frame and press it back into place. Ensure that all clips and fasteners engage properly.
- Secure Screws and Fasteners: Reattach any screws or fasteners you removed earlier.
- Reconnect the Battery: Reconnect the car battery’s negative terminal.
With the door panels securely in place, your newly upgraded car audio system is starting to take shape.
Fine-Tuning Your Car Audio System
Now that your door speakers are wired to the amplifier, and the system is reassembled, it’s time to fine-tune your car audio setup:
- Adjust EQ Settings: Use your car stereo’s equalizer to fine-tune the sound to your preferences. Adjust bass, midrange, and treble settings for the best listening experience.
- Experiment and Enjoy: Take some time to experiment with different music genres and tracks to test the overall sound quality. Make further adjustments as needed.
By fine-tuning your car audio system, you can optimize the sound to suit your musical tastes and enjoy a superior listening experience on the road.
Conclusion
Wiring your door speakers to an amplifier might seem like a complex task, but with the right tools, materials, and a bit of patience, it’s a manageable project that can greatly enhance your car audio experience. By following the steps outlined in this guide, you’ll be well on your way to enjoying a superior sound system in your vehicle. Say goodbye to mediocre car audio and hello to a customized, high-quality listening experience!