When it comes to upgrading your car audio system, few things can make as big an impact as a powerful subwoofer. However, installing a subwoofer involves more than just choosing the right one for your car. Understanding how to wire it correctly is crucial for getting the best sound quality and ensuring your subwoofer works optimally. In this guide, we’ll walk you through how to wire dvc 4 ohm sub step by step, so you can enjoy that deep, thumping bass in your car stereo.
Understanding DVC 4-Ohm Subwoofers
Before we dive into the wiring process, it’s essential to understand what DVC 4-Ohm subwoofers are. DVC subwoofers have two separate voice coils, each with its own set of terminals. The “4-Ohm” designation refers to the impedance of each coil. In the case of a DVC 4-Ohm subwoofer, each voice coil has an impedance of 4 ohms, which can be wired in various configurations to achieve different total impedances.
Tools and Materials You’ll Need
To get started with wiring your DVC 4-Ohm subwoofers, you’ll need some essential tools and materials. Ensure you have the following items ready.
- DVC 4-Ohm Subwoofers: The ones that suit your car audio setup.
- Amplifier: Ensure it’s compatible with your subwoofer’s requirements.
- Wiring Kit: This includes power and ground cables, RCA cables, and speaker wire.
- Screwdriver: For securing wires and terminals.
- Wire Cutters and Strippers: To prepare the wires for connection.
- Electrical Tape: For insulating and securing connections.
- Wire Connectors: To join wires securely.
Wiring Options for DVC 4-Ohm Subwoofers
There are a few wiring options available when working with DVC 4-Ohm subwoofers. Your choice will depend on the desired impedance and the capability of your amplifier. Here are the most common configurations:
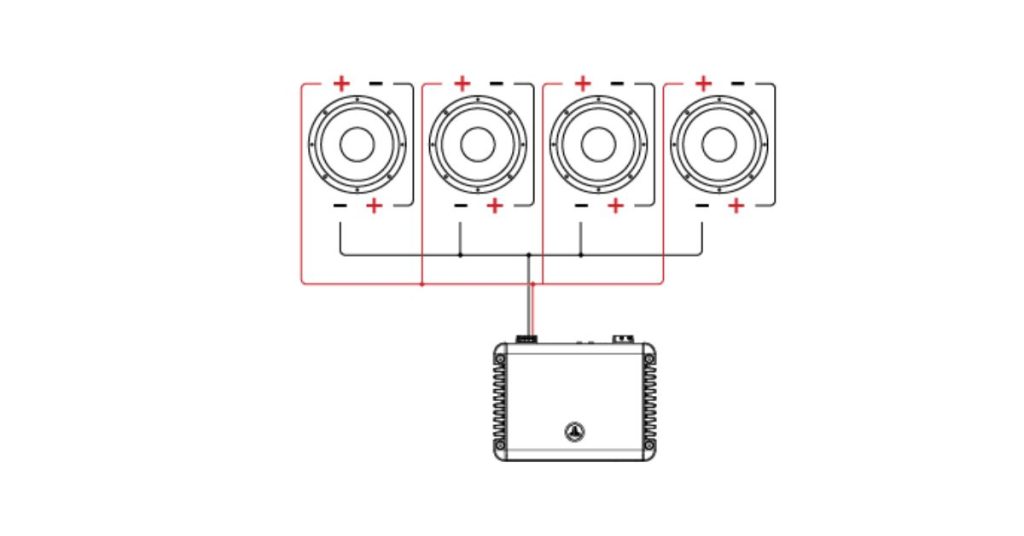
- Series Wiring (8-Ohm Load): To wire your subwoofers in series, connect the positive terminal of one voice coil to the negative terminal of the other on each subwoofer. Then, connect the remaining positive and negative terminals of one subwoofer to your amplifier. This results in an 8-Ohm load, which is ideal for amplifiers designed for higher impedance loads.
- Parallel Wiring (2-Ohm Load): For a 2-Ohm load, connect the two positive terminals of both voice coils together and the two negative terminals together on each subwoofer. Then, connect one set to your amplifier. This configuration is suitable for amplifiers designed to handle lower impedance loads.
- Bridge Wiring (4-Ohm Load): Some amplifiers allow you to bridge two channels to power a single subwoofer. In this case, wire each voice coil to a separate channel on the amplifier. This will also result in a 4-Ohm load, but it’s essential to check if your amplifier supports this configuration.
Step-by-Step Wiring Process
Now that you know the wiring options, let’s proceed with the step-by-step process to wire your DVC 4-Ohm subwoofers:
- Prepare Your Subwoofers: Place the subwoofers in the desired location within your car’s audio setup. Ensure they are securely mounted.
- Connect Voice Coils: Depending on your chosen wiring configuration (series, parallel, or bridge), connect the voice coils accordingly. Use wire connectors and ensure all connections are tight and secure.
- Connect to Amplifier: Connect the wires from your subwoofers to the appropriate terminals on your amplifier. Be sure to follow the wiring diagram in your amplifier’s manual for the specific configuration you’ve chosen.
- Power and Ground: Connect the power and ground cables from your amplifier to your car’s battery. Make sure to fuse the power wire near the battery for safety.
- RCA Connections: If your amplifier has RCA inputs, connect the RCA cables from your car stereo head unit to the amplifier’s RCA inputs.
- Speaker Wire: Run speaker wire from the amplifier to the subwoofers, ensuring that all connections are secure.
- Test Your Setup: Before closing everything up, power on your car stereo and amplifier to ensure everything is functioning correctly. Adjust the settings to achieve the desired bass levels.
Conclusion
How to wire dvc 4 ohm sub? Wiring DVC 4-Ohm subwoofers for your car stereo doesn’t have to be a daunting task. With the right tools, materials, and understanding of wiring configurations, you can enhance your car audio experience by achieving the perfect bass response. Remember to consult your subwoofer and amplifier manuals for specific instructions and compatibility information. By following this guide, you’ll be well on your way to enjoying that deep, thumping bass you’ve always wanted in your car stereo system.