When it comes to upgrading your car audio system, understanding the intricacies of wiring is crucial. Pioneer, a renowned brand in car audio, utilizes a specific color code for its wiring harnesses. In this article, we’ll delve into the details of Pioneer wiring harness colors, shedding light on the purpose of each hue and making your car stereo installation a breeze.
Contents
Pioneer Wiring Harness Colors
Pioneer, like many other car audio manufacturers, follows a standardized color coding system for its wiring harness. Understanding these colors is essential for a seamless installation process. Here’s a breakdown of the main Pioneer wiring harness colors:
- Yellow – Constant Power: The yellow wire in a Pioneer wiring harness is designated for constant power. This means it provides power to the memory and clock functions of your car stereo, ensuring that your settings are retained even when the vehicle is turned off.
- Red – Switched Power: The red wire is for switched power. When the ignition is turned on, this wire delivers power to the car stereo, allowing it to operate. It acts as the switch that activates your audio system.
- Black – Ground: The black wire is the ground wire, providing a pathway for electrical currents to return to the vehicle’s battery. Proper grounding is crucial for optimal performance and safety.
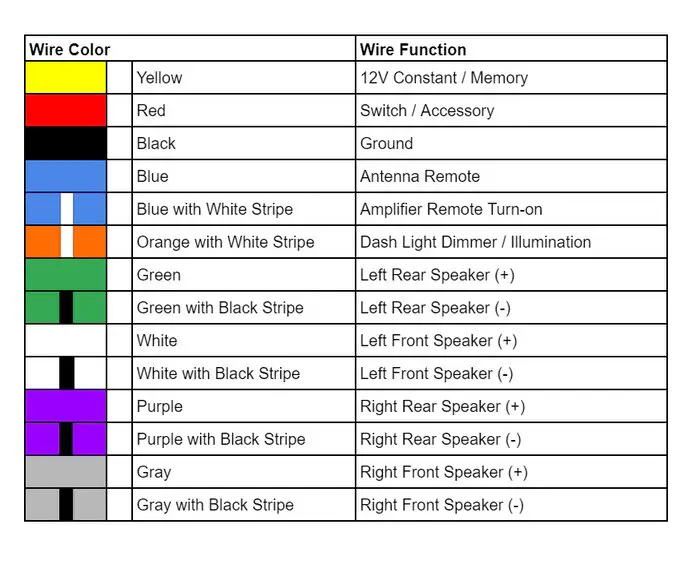
- Blue – Power Antenna/Remote Turn-On: The blue wire serves a dual purpose. In some systems, it is used to power an electric antenna when the radio is turned on. Additionally, it can act as a remote turn-on wire, triggering external amplifiers or other accessories.
- Orange – Illumination: The orange wire is dedicated to controlling the illumination of the head unit. It connects to the vehicle’s dimmer switch, adjusting the display brightness in sync with the dashboard lights.
- White and White/Black – Front Left Speaker: The white wire represents the positive terminal, while white with a black stripe denotes the negative terminal. These wires connect to the front left speaker, providing the audio signal.
- Gray and Gray/Black – Front Right Speaker: Similar to the front left speaker, the gray wires correspond to the positive and negative terminals for the front right speaker.
- Green and Green/Black – Rear Left Speaker: For the rear left speaker, use the green wire for positive and green with a black stripe for negative.
- Purple and Purple/Black – Rear Right Speaker: Lastly, the purple wires are designated for the rear right speaker. Purple represents the positive terminal, while purple with a black stripe signifies the negative terminal.
Are All Pioneer Wiring Harnesses the Same?
Related Issues with Pioneer Wiring Harness
Despite the straightforward color coding, users may encounter issues during and after the installation process. Common problems include:
Incorrectly Matching Wires:
- Mixing up the wires can lead to malfunctioning speakers or even damage to the car’s electrical system.
- Inadequate Insulation:
- Insufficient insulation may result in short circuits, affecting the performance of the car stereo.
- Loose Connections:
- Loose or poorly connected wires can cause intermittent issues, such as loss of audio or power.
Impact of Improper Wiring:
Improper wiring can have a significant impact on the performance of your Pioneer car stereo system. Potential consequences include electrical issues, speaker malfunction, and in extreme cases, damage to the car’s electrical system.
FAQs on Pioneer Wiring Harness Colors
Q: What do I do if the colors on my Pioneer wiring harness don’t match my car’s wiring?
A: In such cases, consult the user manual for both the car stereo and the vehicle to identify corresponding functions. It’s crucial to match the functions rather than the colors.
Q: Can I use an aftermarket wiring harness adapter with a Pioneer car stereo?
A: Yes, using an aftermarket wiring harness adapter can simplify the installation process by matching the colors and functions between the car and the stereo.
Q: How do I troubleshoot if my Pioneer car stereo isn’t working after installation? A: Double-check the wiring connections, ensure all wires are properly insulated, and consult the user manual for troubleshooting tips. If issues persist, seek professional assistance.
Q: Are there specific considerations for older Pioneer models?
A: Yes, wiring colors may vary between different Pioneer models and across model years. Always refer to the specific user manual for accurate information.
Q: Is it possible to customize the wiring harness colors for a Pioneer car stereo?
A: While it’s technically probable, it is not recommended. Customization increases the risk of errors during installation and may void the warranty.
Tips for Proper Installation
- Use a Wiring Harness Adapter:
- Employing a wiring harness adapter designed for your car model simplifies the installation process and ensures a secure connection.
- Double-Check Compatibility:
- Verify that the Pioneer car stereo model is compatible with your vehicle to avoid compatibility issues.
- Seek Professional Help:
- If you are unsure about the wiring process or encounter difficulties, it’s advisable to seek professional assistance to prevent potential damage.
Conclusion
Understanding Pioneer wiring harness colors is fundamental for a successful car stereo installation. By following the standardized color codes and heeding the tips provided, users can enjoy optimal performance from their Pioneer car audio system. Should any issues arise, the FAQs offer valuable insights for troubleshooting, ensuring a smooth and hassle-free experience with your car stereo.