Are you tired of the flat, uninspiring sound coming from your car stereo system? Do you find yourself constantly adjusting the basic tone controls but still not achieving that perfect sound? Installing an equalizer might be exactly what you need to transform your driving experience. This comprehensive guide will walk you through everything you need to know about connecting an equalizer to your car stereo system.
Contents
- Why Add an Equalizer to Your Car Audio System?
- Types of Car Equalizers
- What You’ll Need for Installation
- Installation Methods: Three Main Approaches
- Step-by-Step Installation Guide
- Troubleshooting Common Issues
- Advanced Equalizer Features
- EQ Settings for Different Music Genres
- Understanding Frequency Ranges
- Final Tips for Optimal Sound Quality
- When to Consider Professional Installation
- Conclusion
Why Add an Equalizer to Your Car Audio System?
Before diving into the installation process, let’s understand why an equalizer is a valuable addition to your car audio setup.
Your car presents unique acoustic challenges. The irregular space, reflective windows, absorbent seats, and competing road noise all affect sound quality. A car equalizer gives you precise control over different frequency ranges, allowing you to address these acoustic issues and customize the sound to your preferences.
With an equalizer, you can:
- Fine-tune specific frequency ranges for clearer vocals and crisper instruments
- Boost low frequencies for deeper bass without distortion
- Cut frequencies that cause unwanted resonance in your vehicle
- Compensate for speaker placement limitations
- Create different sound profiles for different music genres
Types of Car Equalizers
When shopping for a car equalizer, you’ll encounter several options:
1. In-dash Equalizers
These equalizers replace or integrate with your existing head unit. They offer a clean, factory-like appearance but typically provide fewer bands of adjustment than other options.
2. Trunk-mounted Equalizers
These standalone units are installed in your trunk or under a seat. They offer more adjustment bands (often 7-31) and sometimes include additional features like crossovers and line drivers.
3. Digital Signal Processors (DSPs)
Modern DSPs represent the cutting edge of sound adjustment technology. They offer precise digital control, multiple adjustment bands, time alignment capabilities, and often come with smartphone apps for easy adjustments.
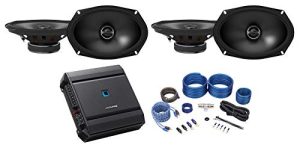
What You’ll Need for Installation
Before you begin connecting an equalizer to your car stereo, gather these essential tools and materials:
- Car equalizer of your choice
- Wiring harness compatible with your head unit (if applicable)
- RCA cables (typically 2-4 pairs depending on your setup)
- Power wire (usually 16-18 gauge)
- Ground wire
- Remote turn-on wire
- Wire strippers/crimpers
- Electrical tape or heat shrink tubing
- Mounting screws
- Screwdriver set
- Multimeter (for testing connections)
- Cable ties for organizing wires
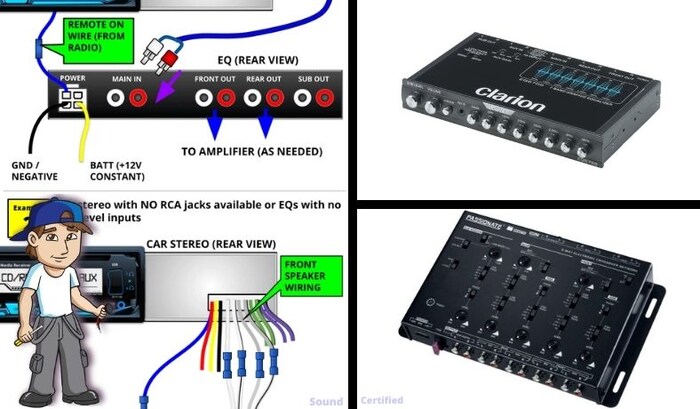
Installation Methods: Three Main Approaches
There are three primary ways to integrate an equalizer into your car audio system. The best method depends on your existing setup and personal preferences.
Method 1: Head Unit → Equalizer → Amplifier → Speakers
This is the most common and recommended setup for aftermarket systems. The signal flows from your head unit to the equalizer, then to your amplifier(s), and finally to your speakers.
Pros:
- Cleanest signal path
- Allows the equalizer to process the signal before amplification
- Works well with most aftermarket components
Cons:
- Requires an external amplifier
- More complex installation
Method 2: Head Unit → Amplifier → Equalizer → Speakers
In this configuration, the signal is amplified first, then equalized.
Pros:
- Can work with factory amplifiers
- Sometimes easier to integrate with factory systems
Cons:
- Not ideal from a signal processing standpoint
- May introduce noise if the amplified signal is too hot for the equalizer
Method 3: Using Speaker-Level Inputs
If you’re keeping a factory stereo that lacks preamp outputs, you might need to use the equalizer’s speaker-level inputs (if available).
Pros:
- Compatible with factory systems without RCA outputs
- Doesn’t require replacing the head unit
Cons:
- Not all equalizers have speaker-level inputs
- May result in slightly lower sound quality than line-level connections
Step-by-Step Installation Guide
Now let’s walk through the detailed process of installing an equalizer in your car audio system using Method 1 (the most common approach).
Step 1: Prepare Your Vehicle
Safety comes first! Follow these important preparation steps:
- Disconnect the negative terminal of your car battery to prevent electrical shorts.
- Choose a suitable mounting location for your equalizer. Common spots include:
- Under the dashboard
- In the glove compartment
- Under a seat
- In a center console
- Custom-mounted in a spare DIN slot
- Ensure your chosen location is dry, away from direct heat sources, and allows access to the equalizer’s controls.
Step 2: Run the Power Wires
Your equalizer needs power to function:
- Connect a power wire (typically 16-18 gauge) to the positive terminal of your battery or to the fuse box. Use an inline fuse holder with an appropriate fuse (check your equalizer’s manual for recommended fuse rating).
- Run this wire through the firewall into the cabin, keeping it away from moving parts and heat sources.
- Find a solid metal point on the vehicle chassis for grounding. Sand away any paint to ensure metal-to-metal contact. Connect your ground wire to this point.
- For the remote turn-on wire, you can tap into the head unit’s remote wire (often blue) or any wire that provides 12V only when the ignition is on.
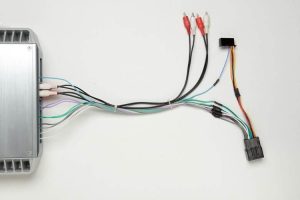
Step 3: Connect the Signal Cables
Now it’s time to connect the audio signal paths:
- Run RCA cables from your head unit’s preamp outputs to the equalizer’s inputs. If your head unit has front, rear, and subwoofer outputs, you’ll need multiple pairs of RCA cables.
- Connect additional RCA cables from the equalizer’s outputs to your amplifier’s inputs, maintaining the same channel configuration.
- Keep RCA cables away from power wires to prevent noise and interference. When power and signal cables must cross, have them cross at 90-degree angles.
Step 4: Mount the Equalizer
Once all connections are prepared:
- Secure the equalizer in your chosen location using mounting brackets, screws, or double-sided mounting tape.
- Make sure the mounting is sturdy enough to prevent the unit from moving during driving.
- Leave enough space around the unit for ventilation and access to controls.
Step 5: Connect All Wires
With the equalizer mounted:
- Connect the power wire to the equalizer’s power terminal.
- Connect the ground wire to the equalizer’s ground terminal.
- Connect the remote turn-on wire to the equalizer’s remote terminal.
- Connect the RCA cables to their respective input and output terminals on the equalizer.
- Double-check all connections before proceeding.
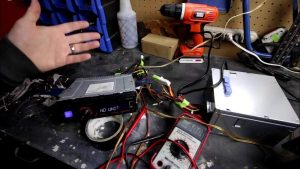
Step 6: Test the System
It’s time to make sure everything works:
- Reconnect your car battery.
- Turn on your stereo system with the volume low.
- Verify that the equalizer powers on with the ignition.
- Play some music and confirm sound is coming through all speakers.
- Listen for any unusual noises like hums or buzzes that might indicate grounding issues.
Step 7: Adjust the Equalizer Settings
Now for the fun part – tuning your equalizer:
- Start with all bands at the neutral position (usually the center position).
- Play music you’re familiar with that covers a wide frequency range.
- Make small adjustments to each frequency band, listening for the changes.
- Remember that cutting certain frequencies often yields better results than boosting others.
- Take your time with this process – good tuning can’t be rushed.
Troubleshooting Common Issues
Even with careful installation, you might encounter some issues. Here are solutions to common problems:
Engine Noise or Whining
If you hear a whine that changes with engine RPM:
- Check your ground connection. Make sure it’s secure and connecting to clean, bare metal.
- Verify that your RCA cables are high quality and properly shielded.
- Try repositioning RCA cables away from power wires.
- Consider adding a ground loop isolator if the problem persists.
No Sound
If you’re not getting any sound:
- Check that the equalizer is powering on (look for indicator lights).
- Verify all RCA connections are secure and in the correct inputs/outputs.
- Make sure the remote wire is properly connected and receiving voltage when the stereo is on.
- Check that the equalizer’s input/output settings match your system configuration.
Distorted Sound
If the sound is distorted:
- Check the input level settings on your equalizer. They might be set too high.
- Verify that your head unit’s output volume isn’t too high for the equalizer’s inputs.
- Ensure that you haven’t applied too much boost to any frequency bands.
Advanced Equalizer Features
Many modern equalizers offer advanced features worth exploring:
Crossover Functions
Many equalizers include built-in crossovers that let you direct specific frequency ranges to appropriate speakers:
- High-pass filters: Send only higher frequencies to smaller speakers
- Low-pass filters: Send only bass frequencies to subwoofers
- Bandpass filters: Send a specific range of frequencies to mid-range speakers
Time Alignment
Higher-end digital equalizers offer time alignment, which adjusts when the sound from each speaker reaches your ears, creating a more coherent soundstage.
Preset Storage
Some equalizers allow you to save different EQ curves as presets, making it easy to switch between settings for different music genres or listening preferences.
Spectrum Analysis
Advanced units might include real-time spectrum analyzers that display the frequency content of your music, helping you make more informed adjustments.
EQ Settings for Different Music Genres
While personal preference always comes first, here are some starting points for different music genres:
Rock
- Slight boost in low bass (around 60-80Hz) for kick drum impact
- Small cut in the lower midrange (200-300Hz) to reduce muddiness
- Modest boost in the upper midrange (1.5-3kHz) for guitar clarity
Hip-Hop and Electronic
- Stronger boost in the sub-bass region (30-60Hz)
- Slight cut around 300-500Hz to prevent boomy bass
- Small boost around 10kHz for hi-hat and cymbal clarity
Classical and Jazz
- Flatter overall curve with minimal adjustments
- Small boost around 80-120Hz for warmth
- Gentle boost in the 8-12kHz range for air and space
Vocal-focused Music
- Boost in the 2-5kHz range to enhance vocal presence
- Small cut around 200-300Hz to reduce chest resonance
- Mild boost around 10-15kHz for breath and sibilance detail
Understanding Frequency Ranges
To use your equalizer effectively, it helps to understand what you’re adjusting:
- Sub-bass (20-60Hz): The deepest bass that you feel more than hear
- Bass (60-250Hz): Provides the foundation and rhythm of music
- Lower midrange (250-500Hz): Adds warmth but can sound muddy if overemphasized
- Midrange (500Hz-2kHz): Where most instruments and vocals live
- Upper midrange (2-4kHz): Provides clarity and presence
- Presence (4-6kHz): Adds definition and detail to instruments
- Brilliance (6-20kHz): Controls air, space, and sparkle in the music
Final Tips for Optimal Sound Quality
- Trust your ears over visual settings. What looks balanced on the equalizer might not sound best in your specific car.
- Make adjustments while parked, then fine-tune while driving to account for road noise.
- Cut problem frequencies rather than boosting desired ones when possible.
- Make small adjustments. Changes of 1-2dB can make a significant difference.
- Re-adjust your equalizer when you change other components in your system.
- Consider professional tuning if you’re not confident in your adjustments.
When to Consider Professional Installation
While DIY installation is rewarding, consider professional help if:
- You’re working with an expensive factory system with integrated components
- Your vehicle has complex electronic systems that might be affected
- You lack the necessary tools or technical experience
- You want custom mounting solutions that require fabrication
Professional installers have the tools and experience to achieve optimal results, often with a warranty on their work.
Conclusion
Adding an equalizer to your car stereo system opens up a world of sound customization possibilities. With the right approach to installation and tuning, you can transform your daily commute or road trip into an immersive audio experience tailored exactly to your preferences.
Remember that patience is key when tuning your system. Take time to learn how each adjustment affects the overall sound, and don’t be afraid to experiment with different settings. Your perfect sound signature might take some time to discover, but the results are well worth the effort.
Whether you’re a casual listener looking for better sound or an audiophile seeking sonic perfection, a properly installed and tuned equalizer will bring new life to your car audio system. Enjoy the journey to better sound!