A powerful car audio system delivers heart-pounding bass and crystal-clear sound, but it demands serious electrical power. If you’ve upgraded your car stereo with high-performance amplifiers, subwoofers, or speakers, your stock battery might struggle to keep up. Dimming headlights, weak sound output, or even a drained battery signal it’s time to add a second battery to your setup. This guide walks you through the process of installing a second battery for your car audio system, ensuring your music stays loud and your vehicle runs smoothly. Let’s dive into the details and get your system powered up!
Contents
- Why Add a Second Battery for Car Audio?
- Choosing the Right Second Battery
- Tools and Materials You’ll Need
- Step-by-Step Guide to Installing a Second Battery
- Tips for Maintaining Your Dual Battery Setup
- Common Mistakes to Avoid
- Benefits of a Dual Battery Setup
- When to Consider Professional Installation
- Conclusion
Why Add a Second Battery for Car Audio?
High-powered car audio systems, especially those with subwoofers or multiple amplifiers, draw significant current. Your car’s primary battery, designed to start the engine and power basic electronics, often can’t handle the extra load. When your audio system pulls too much power, it strains the alternator and battery, leading to issues like:
- Dimming headlights or interior lights when the bass hits.
- Reduced audio performance due to insufficient power.
- Shortened battery lifespan or complete battery failure.
- Potential damage to your car’s electrical system.
A second battery acts as a dedicated power source for your audio system, reducing strain on the primary battery. It stores extra energy, ensuring your amplifiers get the juice they need without compromising your vehicle’s ability to start or run essential systems. This setup also stabilizes voltage, delivering consistent sound quality even during intense bass drops.
Choosing the Right Second Battery
Selecting the right battery for your car audio system sets the foundation for a successful installation. Not all batteries suit high-performance audio setups, so consider these factors before making a purchase:
Battery Type
Opt for an Absorbed Glass Mat (AGM) battery for car audio applications. AGM batteries handle deep discharges better than standard lead-acid batteries, making them ideal for powering amplifiers and subwoofers. They’re also maintenance-free, spill-proof, and resistant to vibrations, which is perfect for the harsh environment of a car.
Capacity and Size
Check the battery’s amp-hour (Ah) rating to ensure it meets your system’s power demands. A higher Ah rating means more stored energy, but balance this with your car’s available space. Measure the area where you plan to install the second battery—typically in the trunk or under a seat—to ensure a proper fit.
Cold Cranking Amps (CCA)
While CCA matters more for starting batteries, choose a second battery with a decent CCA rating if it might occasionally support the vehicle’s starting system. For audio-only purposes, prioritize reserve capacity over CCA.
Brand and Quality
Invest in a reputable brand like Optima, Kinetik, or XS Power, known for producing high-quality AGM batteries for car audio. These brands offer reliable performance and durability, ensuring your investment lasts.
LSI Keywords:
Car audio battery, AGM battery for car audio, secondary car battery, high-performance car audio power.
Tools and Materials You’ll Need
Before starting the installation, gather the necessary tools and materials. Having everything on hand streamlines the process and prevents delays. Here’s what you’ll need:
- Second AGM battery (compatible with your audio system).
- Battery isolator or relay (to manage power distribution).
- Battery tray or mount (to secure the battery).
- Heavy-gauge power and ground cables (4-gauge or thicker).
- Battery terminals and connectors.
- Fuse holder and appropriately rated fuse (to protect the system).
- Wire cutters, crimpers, and strippers.
- Wrench set or socket set.
- Screwdrivers (Phillips and flathead).
- Drill and bits (for mounting the battery tray).
- Cable ties and loom for organizing wires.
- Multimeter (to test connections).
- Safety gear: gloves, safety glasses.
Step-by-Step Guide to Installing a Second Battery
Follow these steps to safely and effectively add a second battery to your car audio system. Take your time, double-check connections, and prioritize safety to avoid electrical issues.
Step 1: Plan the Installation
Decide where to place the second battery. The trunk is a common location due to its space and proximity to amplifiers, but ensure the area is well-ventilated and secure. Check your vehicle’s manual for any restrictions on battery placement. Plan the cable routing from the primary battery to the second battery, avoiding sharp edges, moving parts, or hot surfaces like the exhaust.
Step 2: Disconnect the Primary Battery
Safety comes first. Disconnect the negative terminal of your car’s primary battery to prevent electrical shocks or short circuits. Use a wrench to loosen the terminal and set it aside, ensuring it doesn’t touch any metal surfaces.
Step 3: Install the Battery Isolator
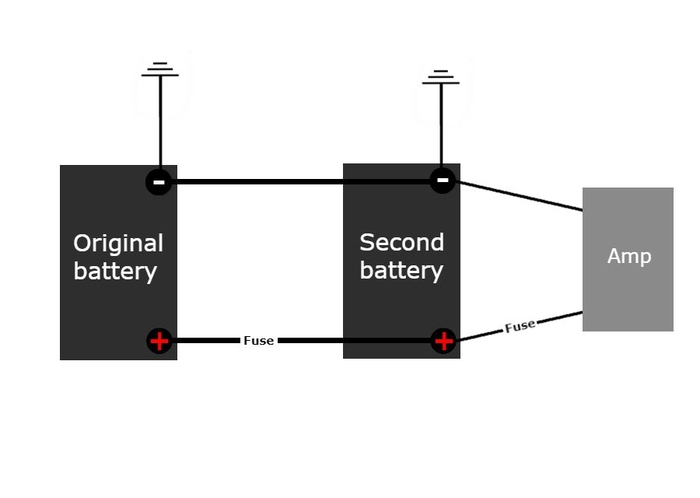
A battery isolator or relay prevents the second battery from draining the primary battery when the car is off. Mount the isolator in an accessible location, such as near the primary battery or in the engine bay. Connect the isolator to the primary battery’s positive terminal using a heavy-gauge cable, following the manufacturer’s wiring instructions. The isolator ensures the alternator charges both batteries while keeping them electrically separate when the engine is off.
Step 4: Mount the Second Battery
Secure the second battery in its designated location using a battery tray or mount. Drill holes if necessary, ensuring you avoid damaging fuel lines, wiring, or other components. Bolt the tray tightly to prevent the battery from shifting during driving. Place the battery in the tray and secure it with the provided hold-down straps or brackets.
Step 5: Run Power and Ground Cables
Run a heavy-gauge power cable from the battery isolator to the positive terminal of the second battery. Use cable ties to secure the cable and prevent it from rubbing against sharp edges. Install a fuse holder with an appropriately rated fuse (e.g., 100-200 amps, depending on your system) within 12 inches of the primary battery to protect the circuit.
Next, connect a ground cable from the negative terminal of the second battery to a clean, unpainted metal surface on the car’s chassis. Sand away any paint or rust to ensure a solid connection. A poor ground can cause voltage drops and audio issues, so take care to make this connection secure.
Step 6: Connect the Audio System
Run power cables from the second battery’s positive terminal to your amplifier or distribution block. Use high-quality connectors and ensure all connections are tight. Ground the amplifier to the same chassis point as the second battery or another nearby metal surface. Double-check that all connections match your amplifier’s specifications.
Step 7: Test the System
Reconnect the primary battery’s negative terminal. Use a multimeter to check the voltage at both batteries, ensuring they read around 12.6 volts when the car is off and 13.8-14.4 volts when running. Start the car and play your audio system at moderate volume. Watch for dimming lights or unusual noises, which could indicate a wiring issue.
Step 8: Secure and Organize
Once everything works correctly, secure all cables with cable ties or loom to prevent movement. Double-check that the battery, isolator, and fuse holder are firmly mounted. Clean up your workspace and ensure no tools or debris remain in the vehicle.
Tips for Maintaining Your Dual Battery Setup
A dual battery system requires regular care to perform at its best. Follow these tips to keep your setup in top shape:
- Check Connections Regularly: Inspect battery terminals and cables for corrosion or looseness every few months. Clean terminals with a wire brush and apply dielectric grease to prevent corrosion.
- Monitor Battery Health: Use a multimeter to check both batteries’ voltage periodically. Replace any battery that consistently reads below 12 volts when fully charged.
- Balance Charging: Ensure your alternator can handle charging both batteries. If you notice slow charging or overheating, consider upgrading to a high-output alternator.
- Avoid Deep Discharges: While AGM batteries handle deep discharges better than standard batteries, avoid draining them completely to extend their lifespan.
- Test the Isolator: Periodically verify that the isolator prevents the second battery from draining the primary battery when the car is off.
Common Mistakes to Avoid
Even experienced installers make mistakes. Steer clear of these pitfalls to ensure a smooth installation:
- Using Undersized Cables: Thin cables can’t handle high current, leading to voltage drops and overheating. Always use 4-gauge or thicker cables for car audio.
- Skipping the Fuse: A fuse protects your system from electrical faults. Never bypass it, and ensure it’s rated for your system’s amperage.
- Poor Grounding: A weak ground connection causes audio distortion and power issues. Always ground to a clean, unpainted metal surface.
- Incorrect Isolator Wiring: Follow the isolator’s instructions carefully to avoid draining the primary battery or damaging the alternator.
- Ignoring Ventilation: Batteries release small amounts of gas, even AGM types. Ensure the installation area has adequate airflow to prevent buildup.
Benefits of a Dual Battery Setup
Adding a second battery transforms your car audio experience. Here’s why it’s worth the effort:
- Enhanced Audio Performance: Stable voltage ensures your amplifiers deliver maximum power, resulting in louder, clearer sound.
- Protects Vehicle Electronics: Isolating the audio system’s power draw prevents strain on the primary battery and alternator.
- Longer Battery Life: Distributing the load across two batteries reduces wear on each, extending their lifespan.
- Flexibility for Upgrades: A second battery provides room to add more amplifiers or subwoofers without overloading the system.
When to Consider Professional Installation
While installing a second battery is a manageable DIY project for many, some situations call for professional help. Seek a car audio technician if:
- Your vehicle has a complex electrical system or advanced electronics that require specialized knowledge.
- You’re unsure about wiring the isolator or selecting the right battery.
- You lack the tools or confidence to safely complete the installation.
- You want a custom setup with multiple batteries or a high-output alternator.
A professional ensures the job meets safety standards and optimizes your audio system’s performance.
Conclusion
Adding a second battery to your car audio system unlocks the full potential of your stereo, delivering booming bass and crisp highs without compromising your vehicle’s electrical system. By choosing the right battery, using quality components, and following a careful installation process, you create a reliable power source for your amplifiers and subwoofers. Regular maintenance keeps your dual battery setup performing at its peak, ensuring every drive feels like a concert. Grab your tools, pick the perfect battery, and take your car audio to the next level today!