Introduction Car audio systems are a popular upgrade for car enthusiasts who want to enhance their driving experience. A car audio capacitor is an essential component that helps to maintain a consistent flow of power to the audio system. In this article, we will discuss how to charge a car audio capacitor in a simple and easy-to-understand way.
Contents
- What is a Car Audio Capacitor?
- Types of Car Audio Capacitors
- How to Choose the Right Capacitor for Your Car Audio System?
- Why Do You Need to Charge a Car Audio Capacitor?
- Tools You Need to Charge a Car Audio Capacitor
- How to Charge a Car Audio Capacitor
- Tips for Maintaining a Car Audio Capacitor
- Conclusion
What is a Car Audio Capacitor?
Before diving into the charging process, let’s first understand what a car audio capacitor is. A car audio capacitor is an electrical component that stores energy and releases it as needed. It acts as a buffer between the car’s battery and the audio system, ensuring that the audio system receives a constant and stable flow of power. This helps to improve the sound quality and prevent the system from overloading.
Types of Car Audio Capacitors
There are two main types of car audio capacitors: electrolytic and non-electrolytic. Electrolytic capacitors are the most common and affordable type of capacitor. They have a higher capacitance range and are suitable for powering large audio systems. Non-electrolytic capacitors, on the other hand, are more expensive but have a longer lifespan and are more reliable.
How to Choose the Right Capacitor for Your Car Audio System?
- Determine the appropriate capacitance range for your car audio system based on the size and power of the system. Generally, a good rule of thumb is to choose a capacitor with a capacitance rating of 1 Farad for every 1,000 watts of power in the audio system.
- Consider the size and space available in your car for the capacitor. Capacitors come in different sizes, so make sure to choose a capacitor that fits in the available space in your car without interfering with other components or creating a safety hazard.
- Choose between electrolytic and non-electrolytic capacitors based on your budget and the specific needs of your car audio system. Electrolytic capacitors are cheaper and more common, but they have a shorter lifespan and may not perform as well in high-temperature environments. Non-electrolytic capacitors are more expensive but have a longer lifespan and are better suited for high-temperature environments.
- Make sure to match the voltage rating of the capacitor with the voltage of the power supply in your car audio system. Choosing a capacitor with a voltage rating that is too low can lead to damage to the capacitor and other components in the audio system, while choosing a capacitor with a voltage rating that is too high can be unnecessary and more expensive.
Why Do You Need to Charge a Car Audio Capacitor?
- A car audio capacitor helps to maintain a consistent flow of power to the audio system, ensuring that the audio system receives a stable voltage and preventing power surges or drops.
- Without a capacitor, the audio system may overload or experience voltage drops, which can lead to distortion, poor sound quality, or even damage to the audio components.
- A capacitor acts as a buffer between the car’s battery and the audio system, absorbing and releasing energy as needed to maintain a stable voltage and prevent the audio system from using too much power from the battery.
- Charging a car audio capacitor ensures that the capacitor has enough stored energy to maintain a stable voltage in the audio system, improving the sound quality and preventing overload.
- Charging a car audio capacitor is especially important for larger audio systems that require more power, as they are more likely to overload or cause voltage drops without a capacitor.
Tools You Need to Charge a Car Audio Capacitor
- The power supply and its specifications
- The voltmeter and its importance in monitoring the voltage during the charging process
- Safety equipment such as gloves and glasses.
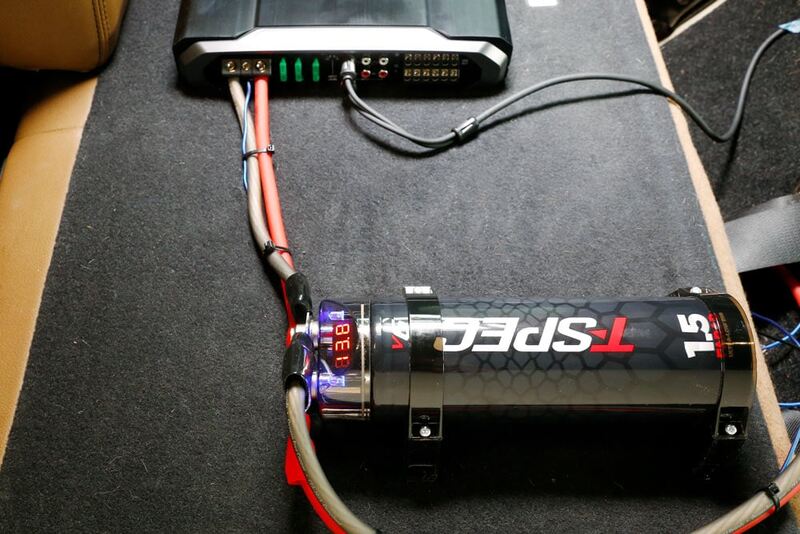
How to Charge a Car Audio Capacitor
Follow these simple steps to charge your car audio capacitor:
Step 1: Disconnect the Power Before you start charging your car audio capacitor, you must first disconnect the power. This involves disconnecting the negative battery terminal to prevent any electrical current from flowing.
Step 2: Determine the Capacitance of Your Capacitor The next step is to determine the capacitance of your capacitor. This is usually measured in Farads (F) and can be found on the capacitor itself or in the manufacturer’s instructions.
Step 3: Calculate the Charging Time Once you know the capacitance of your capacitor, you can calculate the charging time. The charging time is calculated using the following formula:
Charging Time = (Capacitance in Farads x Voltage) / Current
The current can be found on the power supply or in the manufacturer’s instructions. Make sure to use the correct units for each variable to get an accurate result.
Step 4: Connect the Power Supply Once you have calculated the charging time, you can connect the power supply to the capacitor. Make sure to connect the positive terminal of the power supply to the positive terminal of the capacitor, and the negative terminal of the power supply to the negative terminal of the capacitor.
Step 5: Monitor the Voltage While the capacitor is charging, you should monitor the voltage using a voltmeter. The voltage should increase steadily until it reaches the rated voltage of the capacitor.
Step 6: Disconnect the Power Supply Once the capacitor has reached its rated voltage, you can disconnect the power supply. Make sure to disconnect the positive terminal first, then the negative terminal.
Step 7: Reconnect the Power Now that the capacitor is charged, you can reconnect the power. Connect the negative battery terminal first, then the positive terminal.
Tips for Maintaining a Car Audio Capacitor
- Regularly check the capacitor for signs of damage, such as bulging or leaking. If you notice any damage, replace the capacitor immediately to prevent further damage to the audio system.
- Keep the capacitor clean and free of debris, dust, or other contaminants. Use a soft cloth or brush to gently wipe the capacitor clean, taking care not to damage any of the components.
- Avoid exposing the capacitor to extreme temperatures, as this can reduce the lifespan of the capacitor and affect its performance. Make sure the capacitor is installed in a location that is protected from direct sunlight and high temperatures.
- If you are not using your car for an extended period of time, consider disconnecting the capacitor from the audio system and storing it in a cool, dry place to avoid damage from extreme temperatures or humidity.
- Use the correct charging and discharging procedures when charging the capacitor, as incorrect procedures can damage the capacitor or affect its performance. Follow the manufacturer’s instructions carefully and use the appropriate equipment to ensure that the capacitor is charged correctly.
- If you notice any changes in the sound quality of the audio system, such as distortion or poor sound quality, check the capacitor for signs of damage or malfunction. A damaged or malfunctioning capacitor can affect the performance of the entire audio system and may need to be replaced.
Conclusion
A car audio capacitor is an essential component for any car audio system. Charging a car audio capacitor is a simple process that can be done by following these easy steps. Remember to always disconnect the power before charging your capacitor and to monitor the voltage during the charging process. By following these tips, you can ensure that your car audio system receives a constant and stable flow of power, improving the sound quality and preventing overload.